🎱Support & Resistance MTF Pro — Professional S/R Zones for cTrader 🎱
Support & Resistance MTF Pro builds real market zones from swing (pivot) highs/lows, smart-merges nearby extremes, ranks them by strength, and auto-numbers them as S1/S2… R1/R2….
Unlike the Lite version, the Pro edition adds Higher-Timeframe (MTF) zones with priority over lower TF, rich label modes (Simple / Pro), Bid/Ask choice for distance, decay & expiry filters, and performance-tuned HTF recalculation (only on HTF bar close). Optional ATR/Fixed half-bands highlight just the nearest S & R for ultra-clear execution.
It’s the advanced version of our popular S/R engine — now with cleaner visuals, faster reads, and deeper control.
✅ Main Features:
- MTF priority zones: higher-timeframe levels upgrade overlapping lower-TF zones (price, width, weight).
- Auto-numbered levels: S1/S2… R1/R2… with HTF prefixes (e.g., H1-S1, D1-R1) for instant orientation.
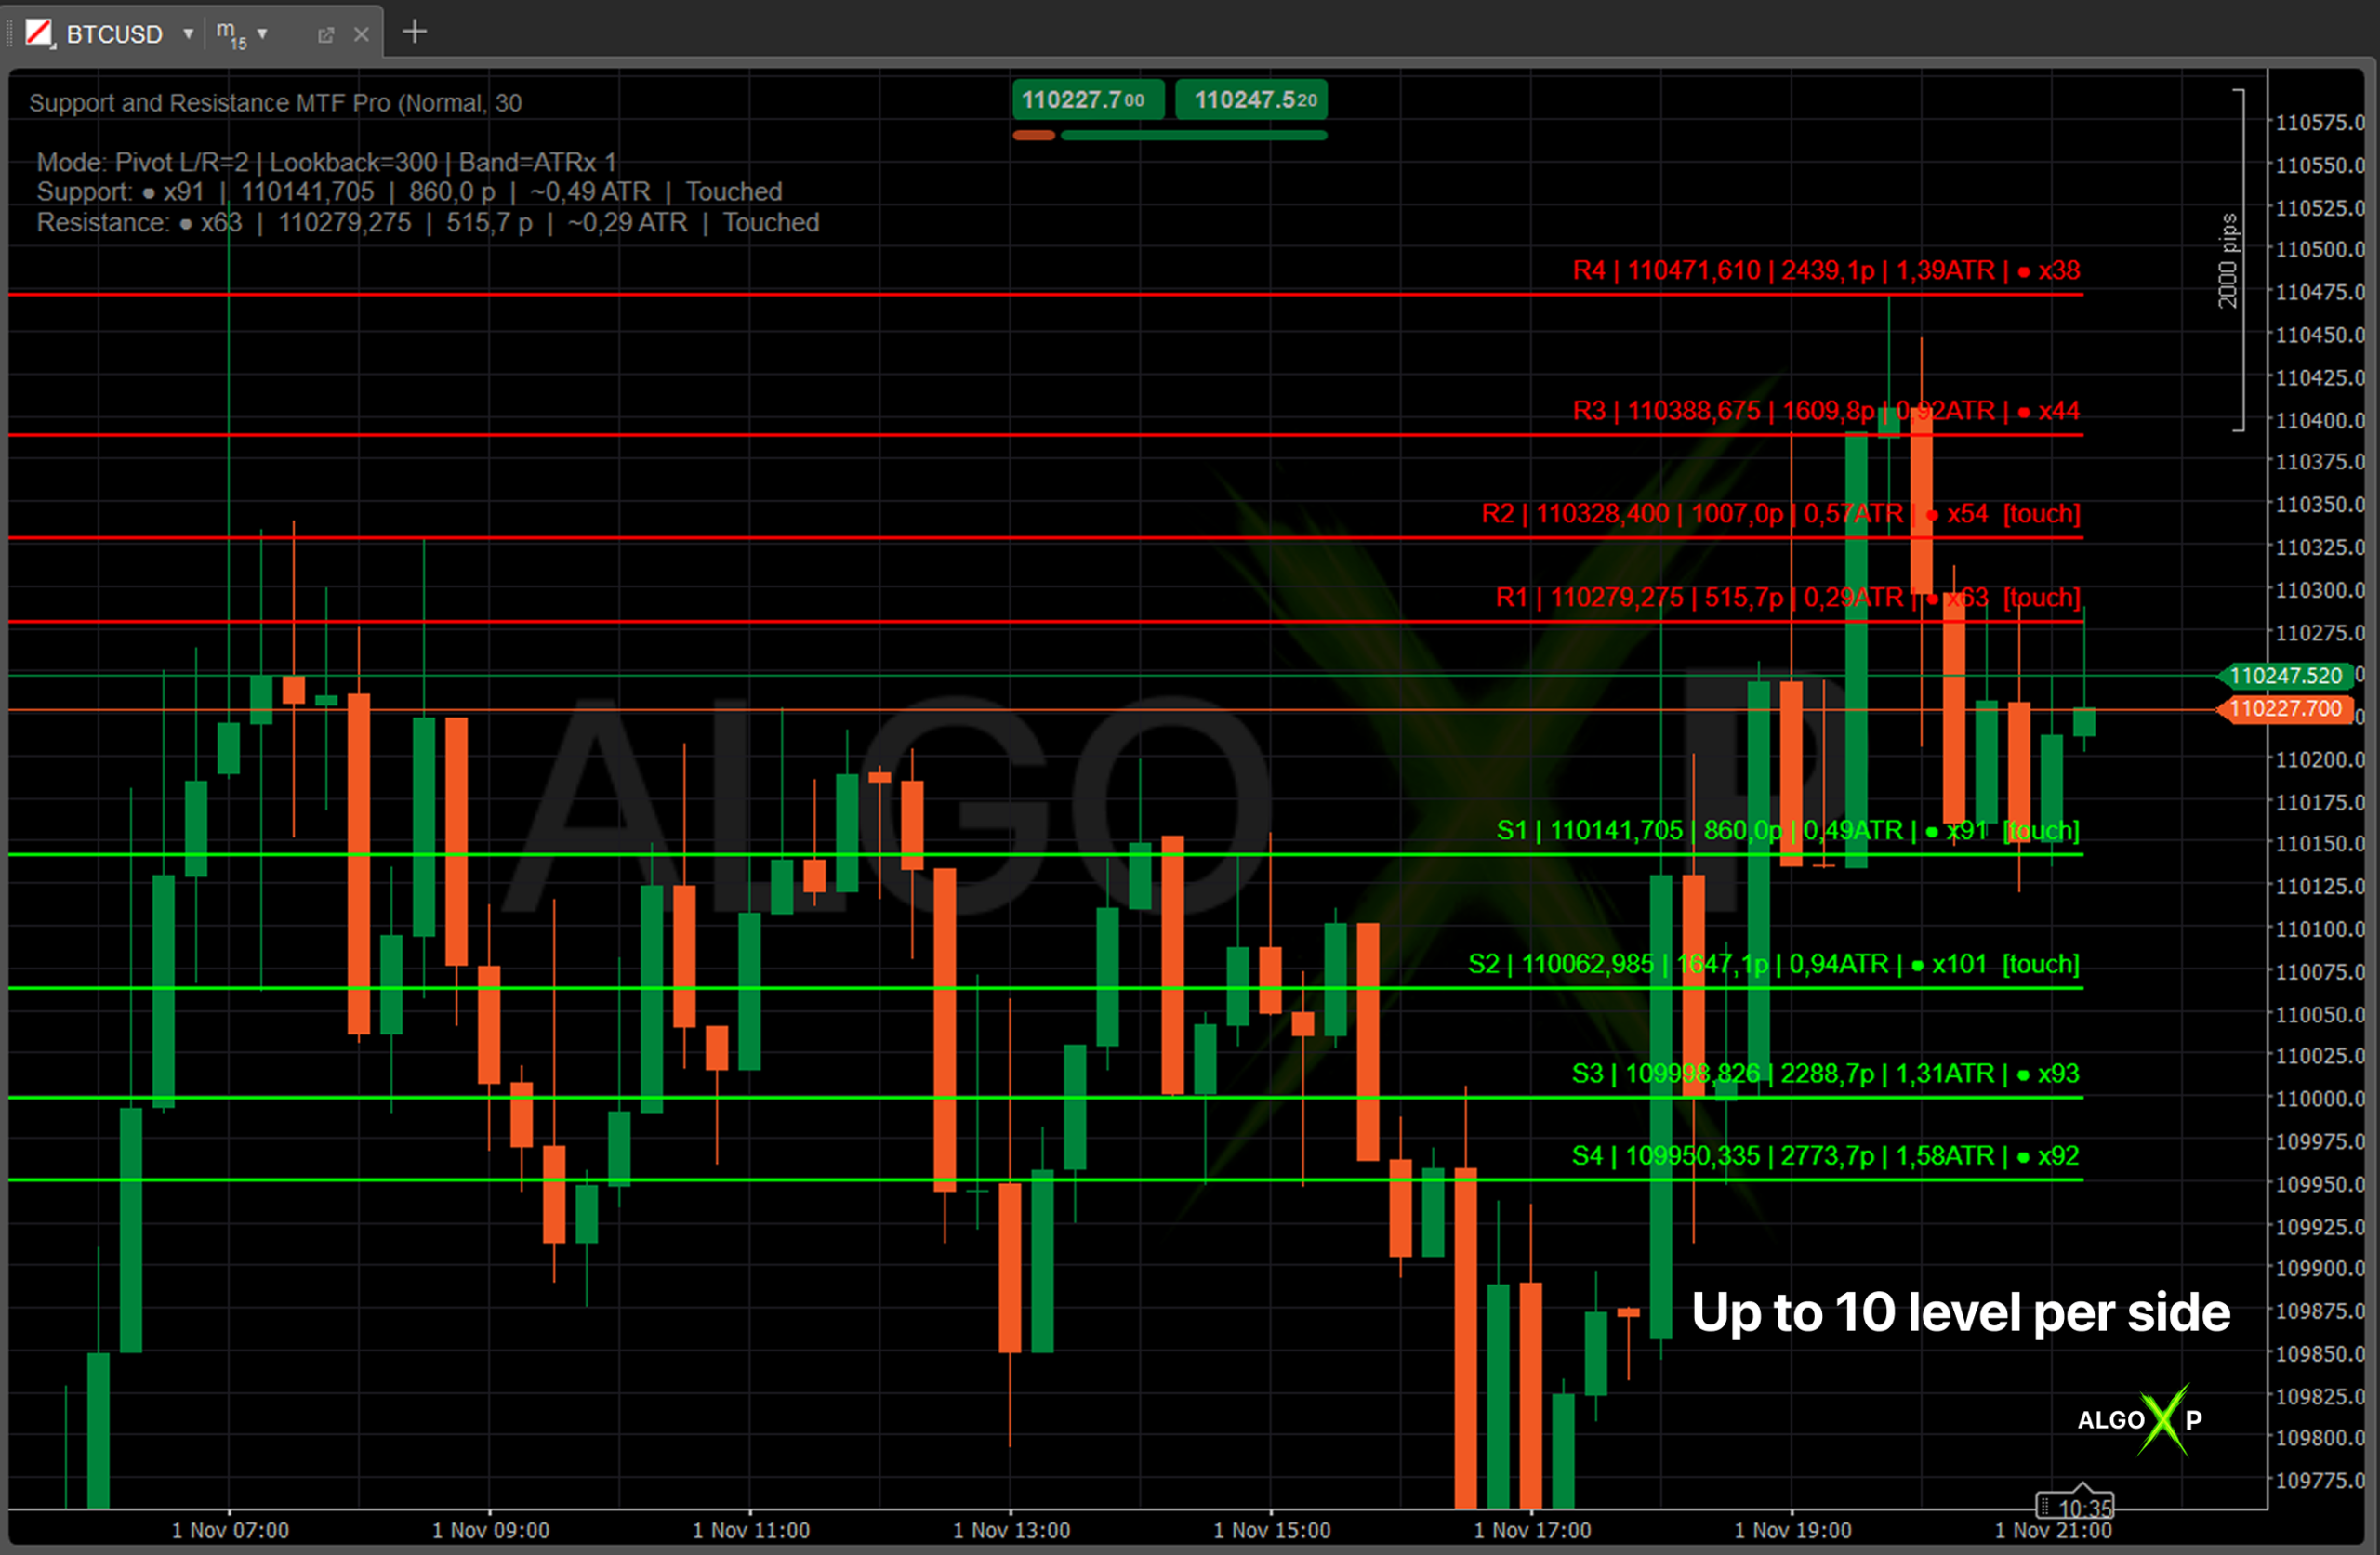
- Swing-true detection: zones from actual pivots; smart merge; per-side cap (up to 10) keeps charts clean.
- Two label modes:
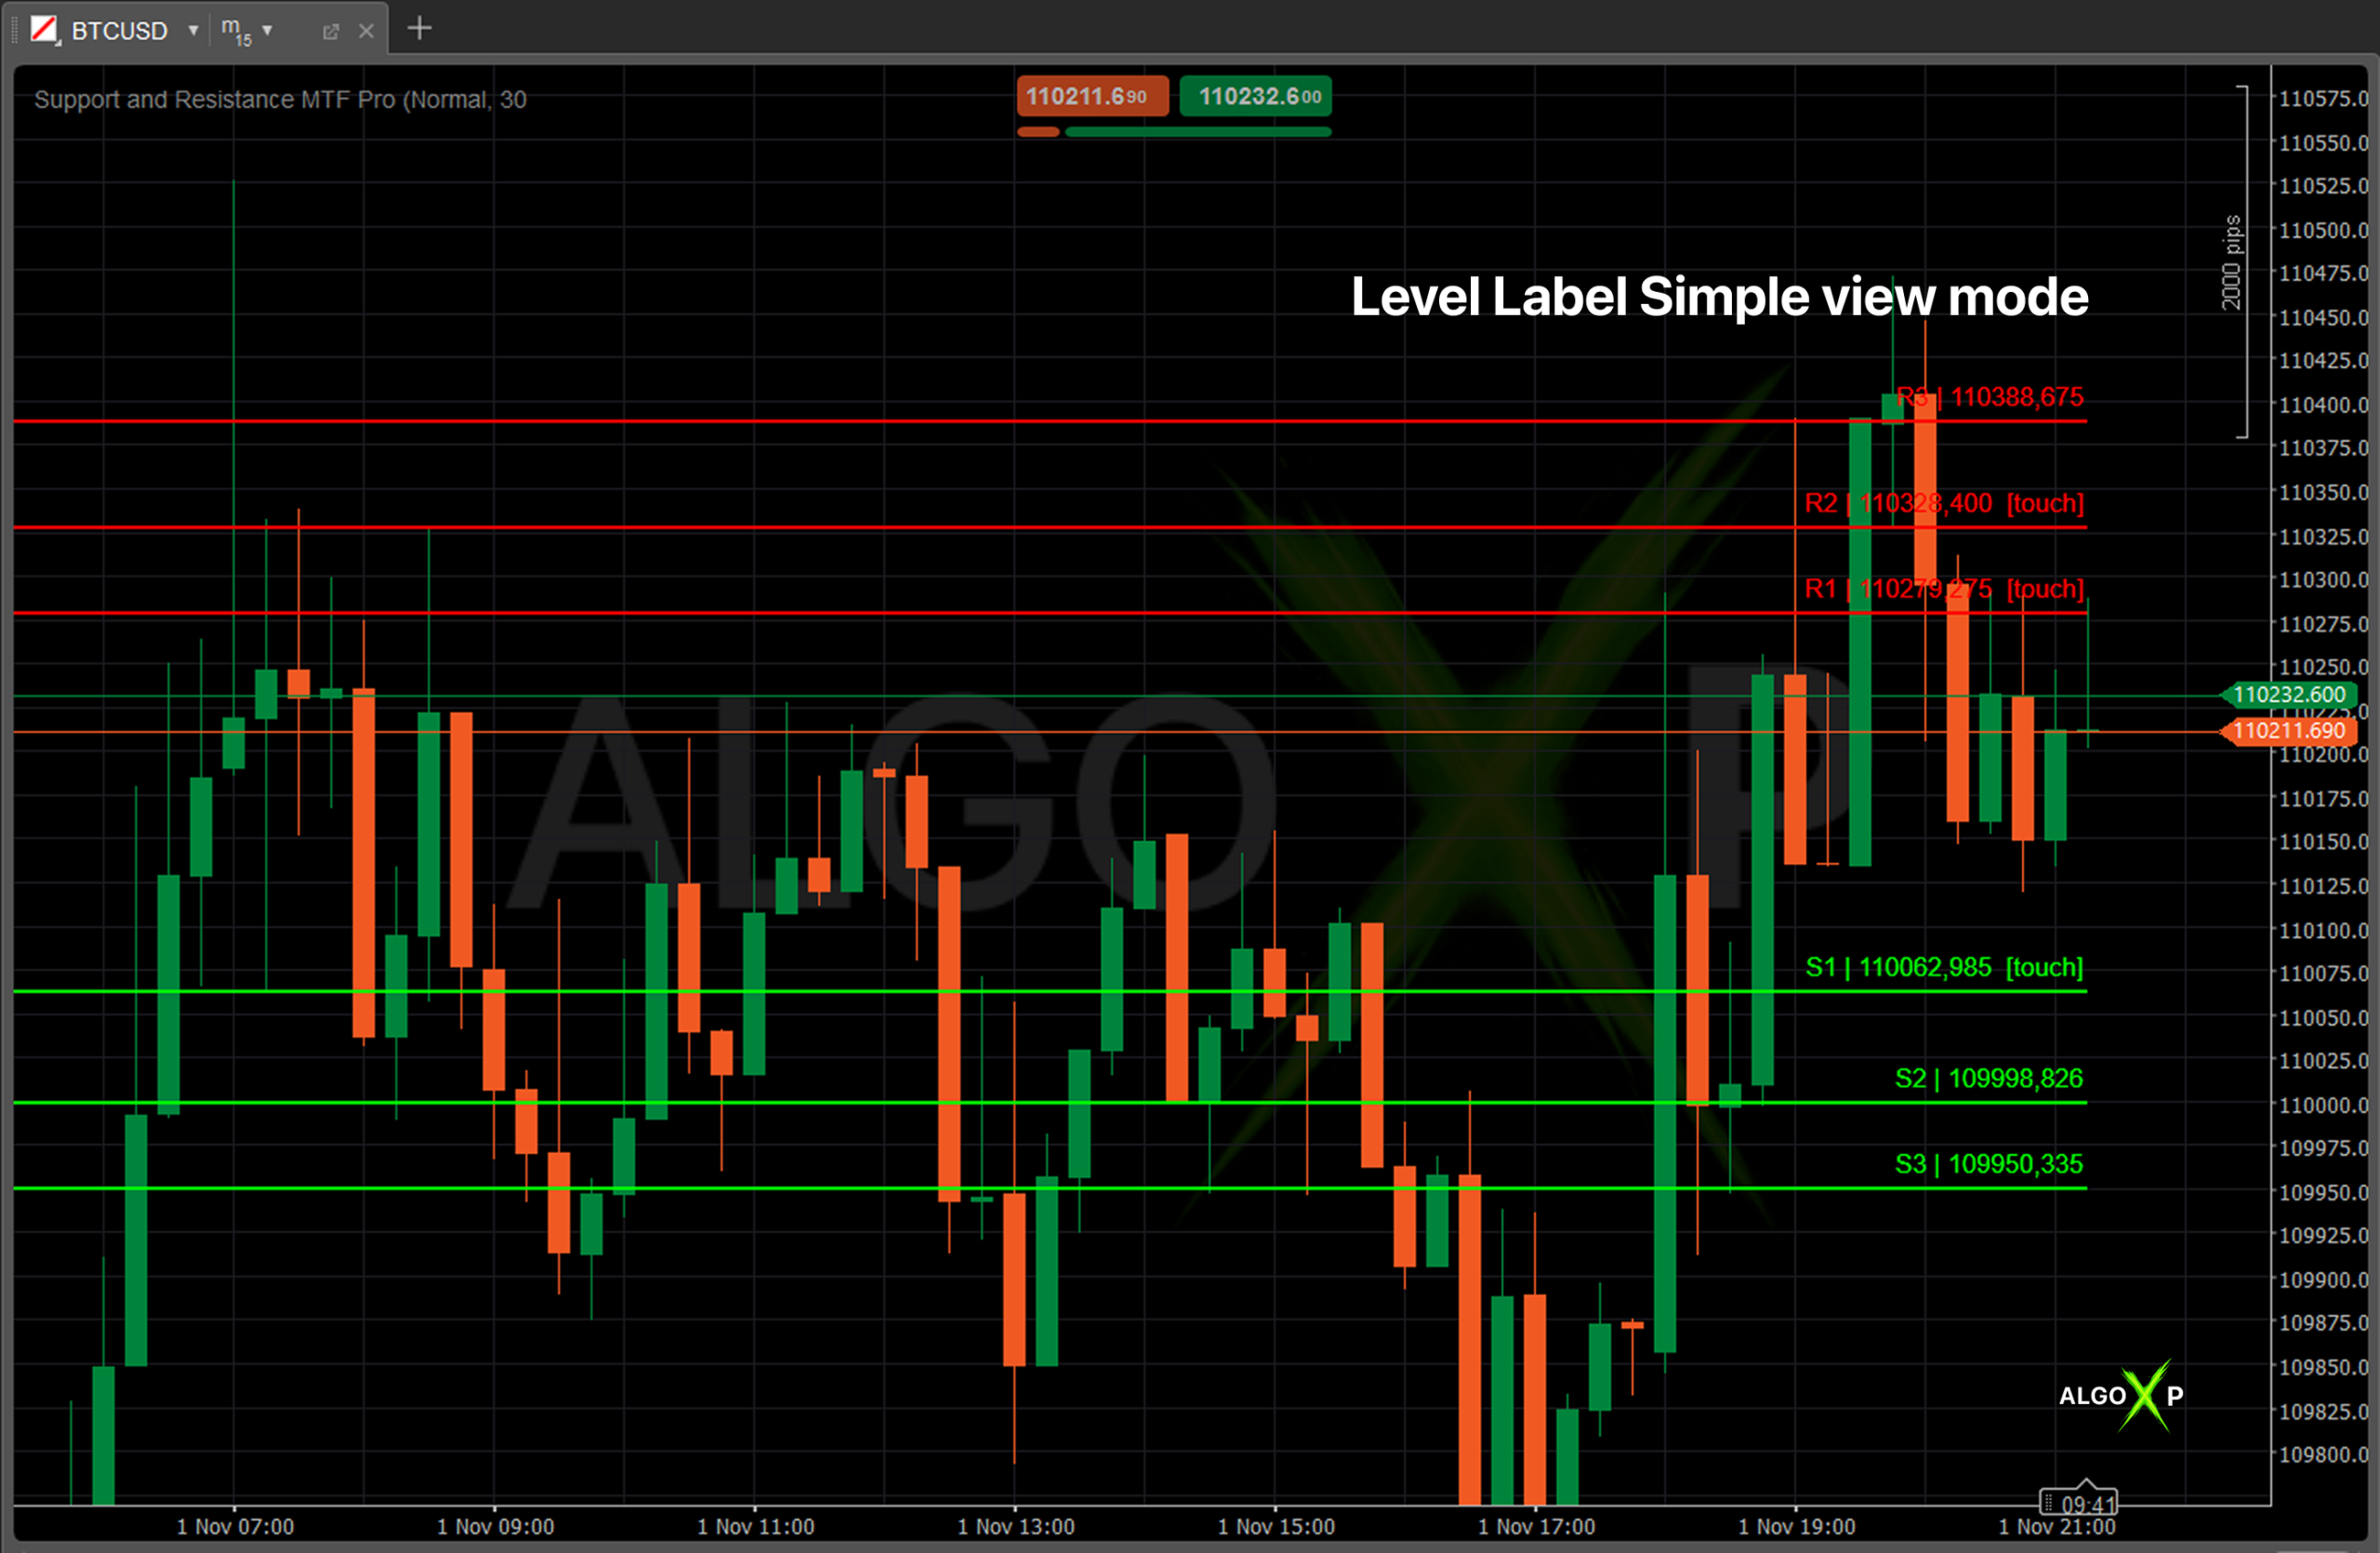
- • Simple →
S1 | 1.08340 - • Pro →
S1 | 1.08340 | 18.7p | 0.68ATR | ● x5 - Correct distance math: choose Bid or Ask as reference for pips/ATR — ideal for FX, metals, indices, crypto.
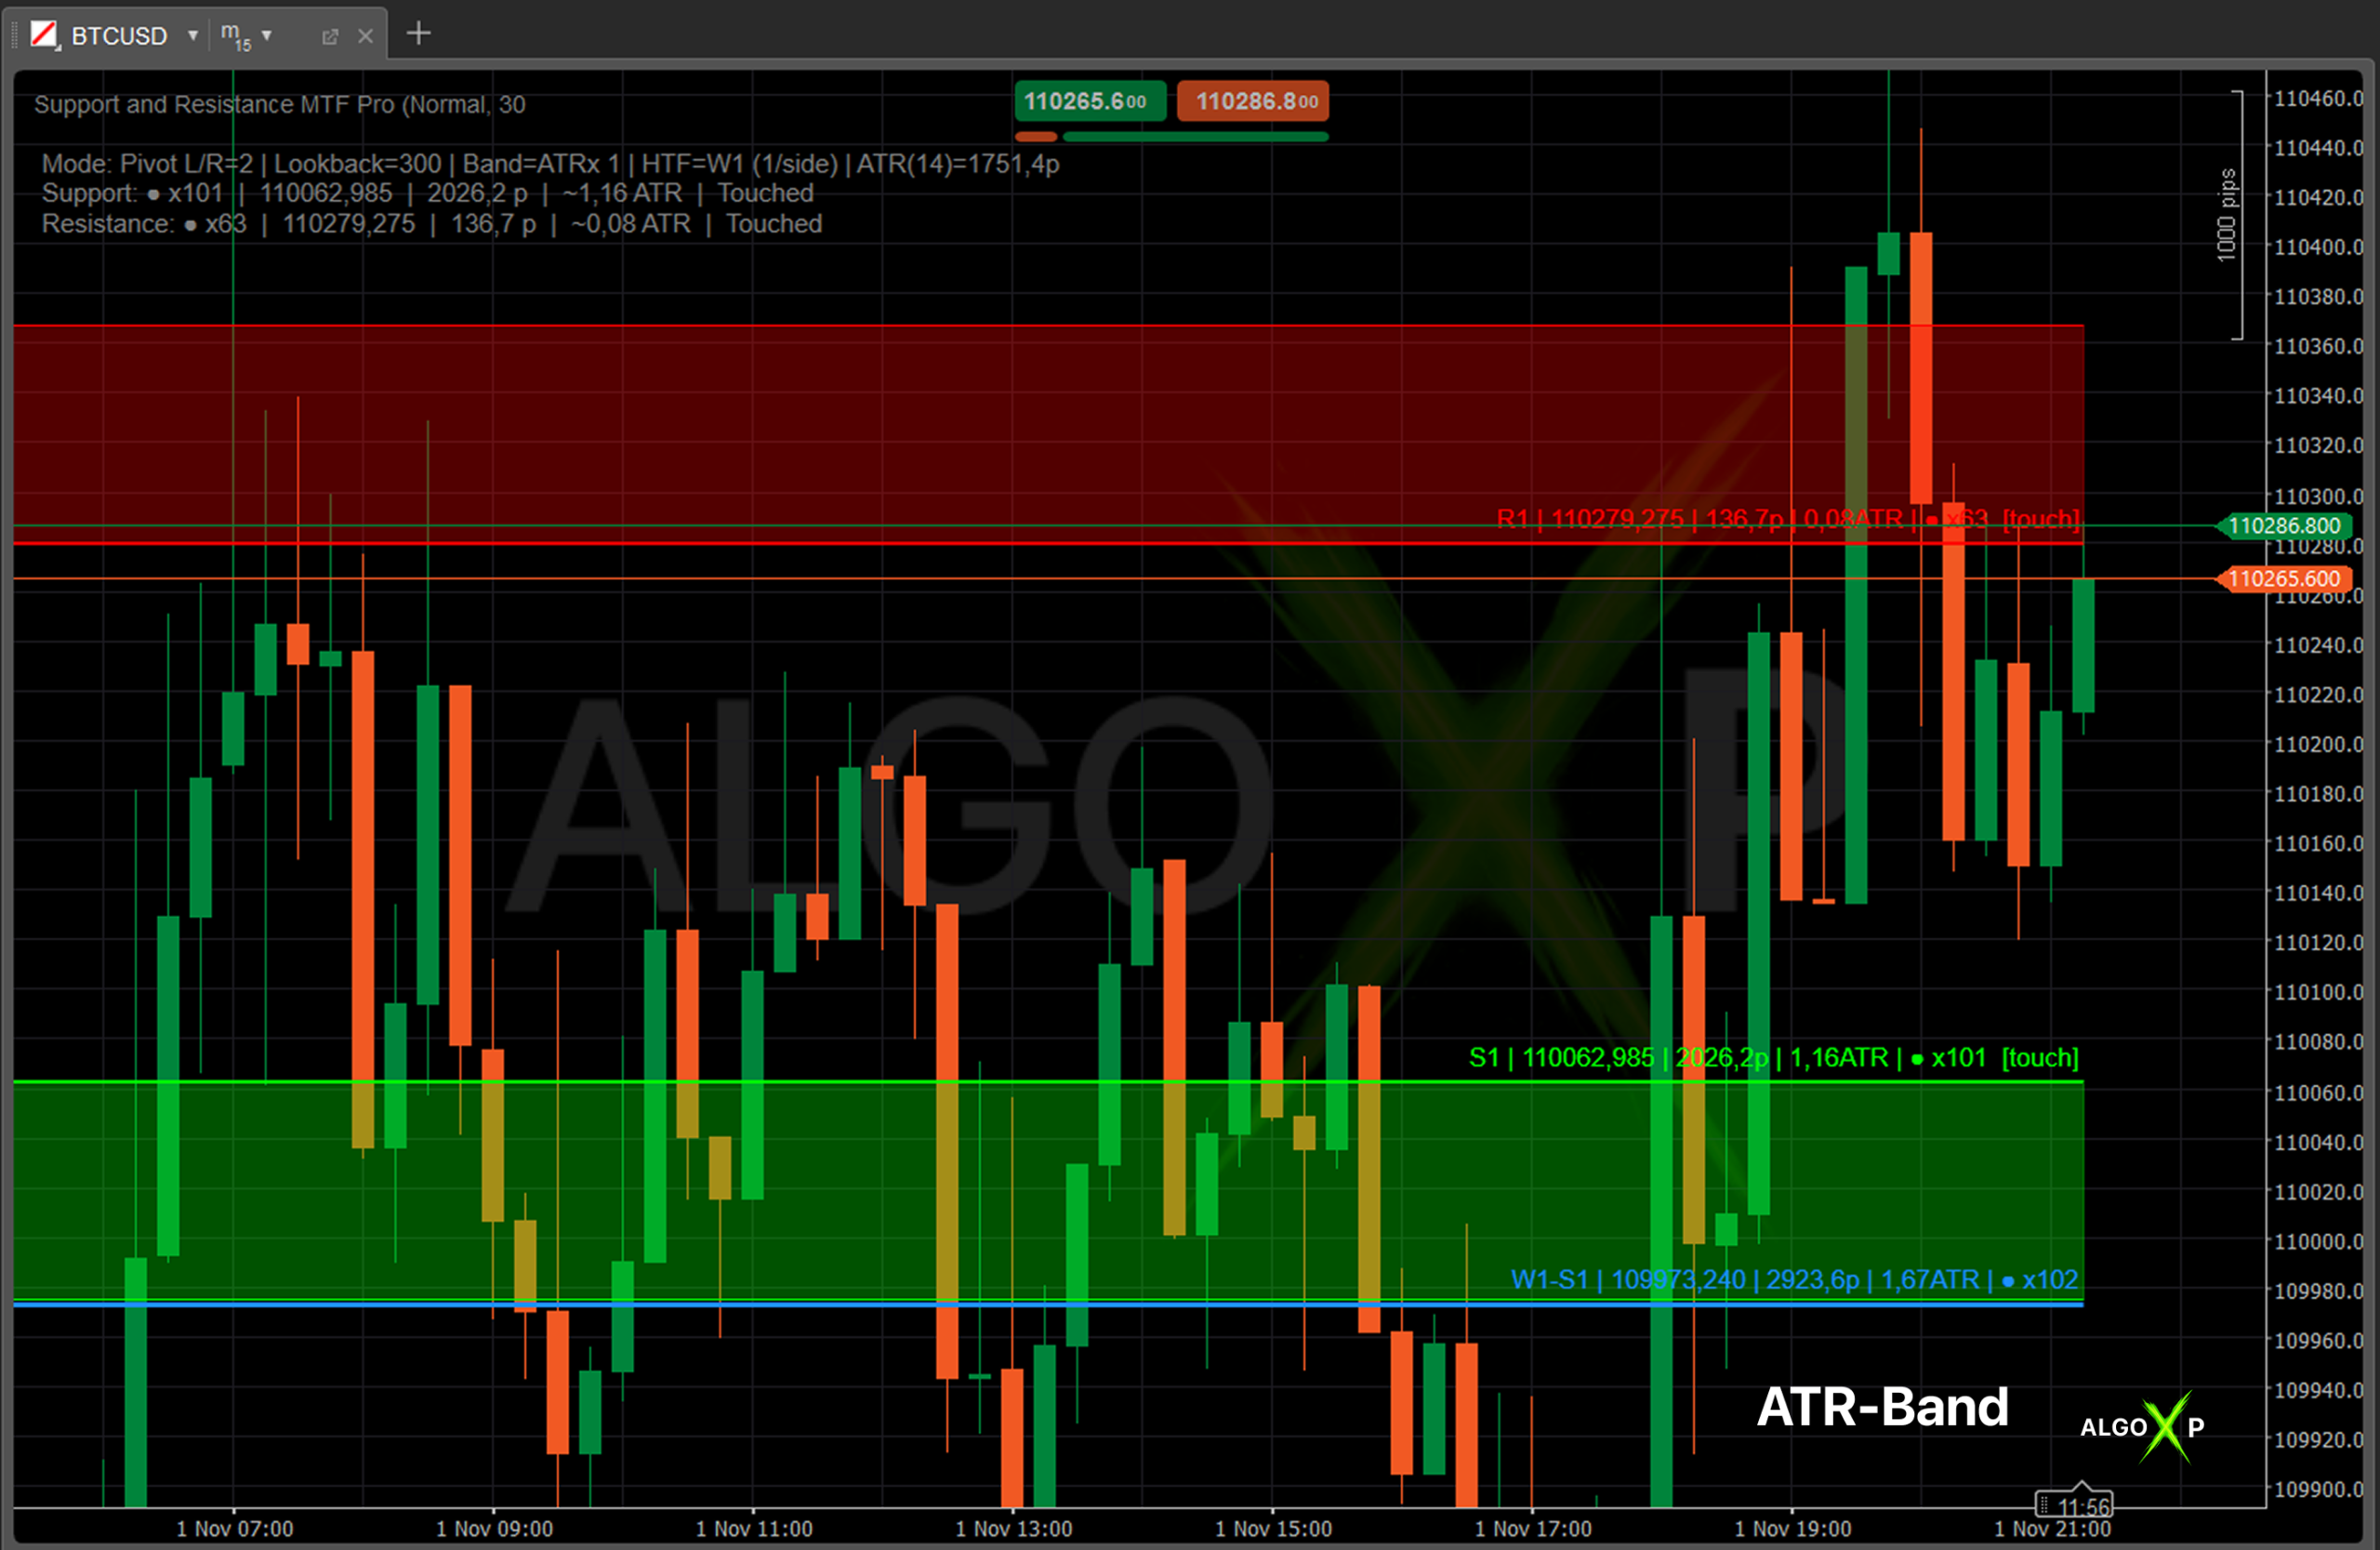
- Nearest Bands only: optional semi-transparent half-bands (ATR×Factor or Fixed pips) on the closest S & R.
- Strength metrics: raw touch count (● xN) with optional decay (Half-Life) and level expiry by age.
- Performance-tuned: HTF structure recalculates only when the HTF bar closes — no flicker, no drag.
- Compact HUD: shows mode, ATR(14), and live distance to the nearest support/resistance.
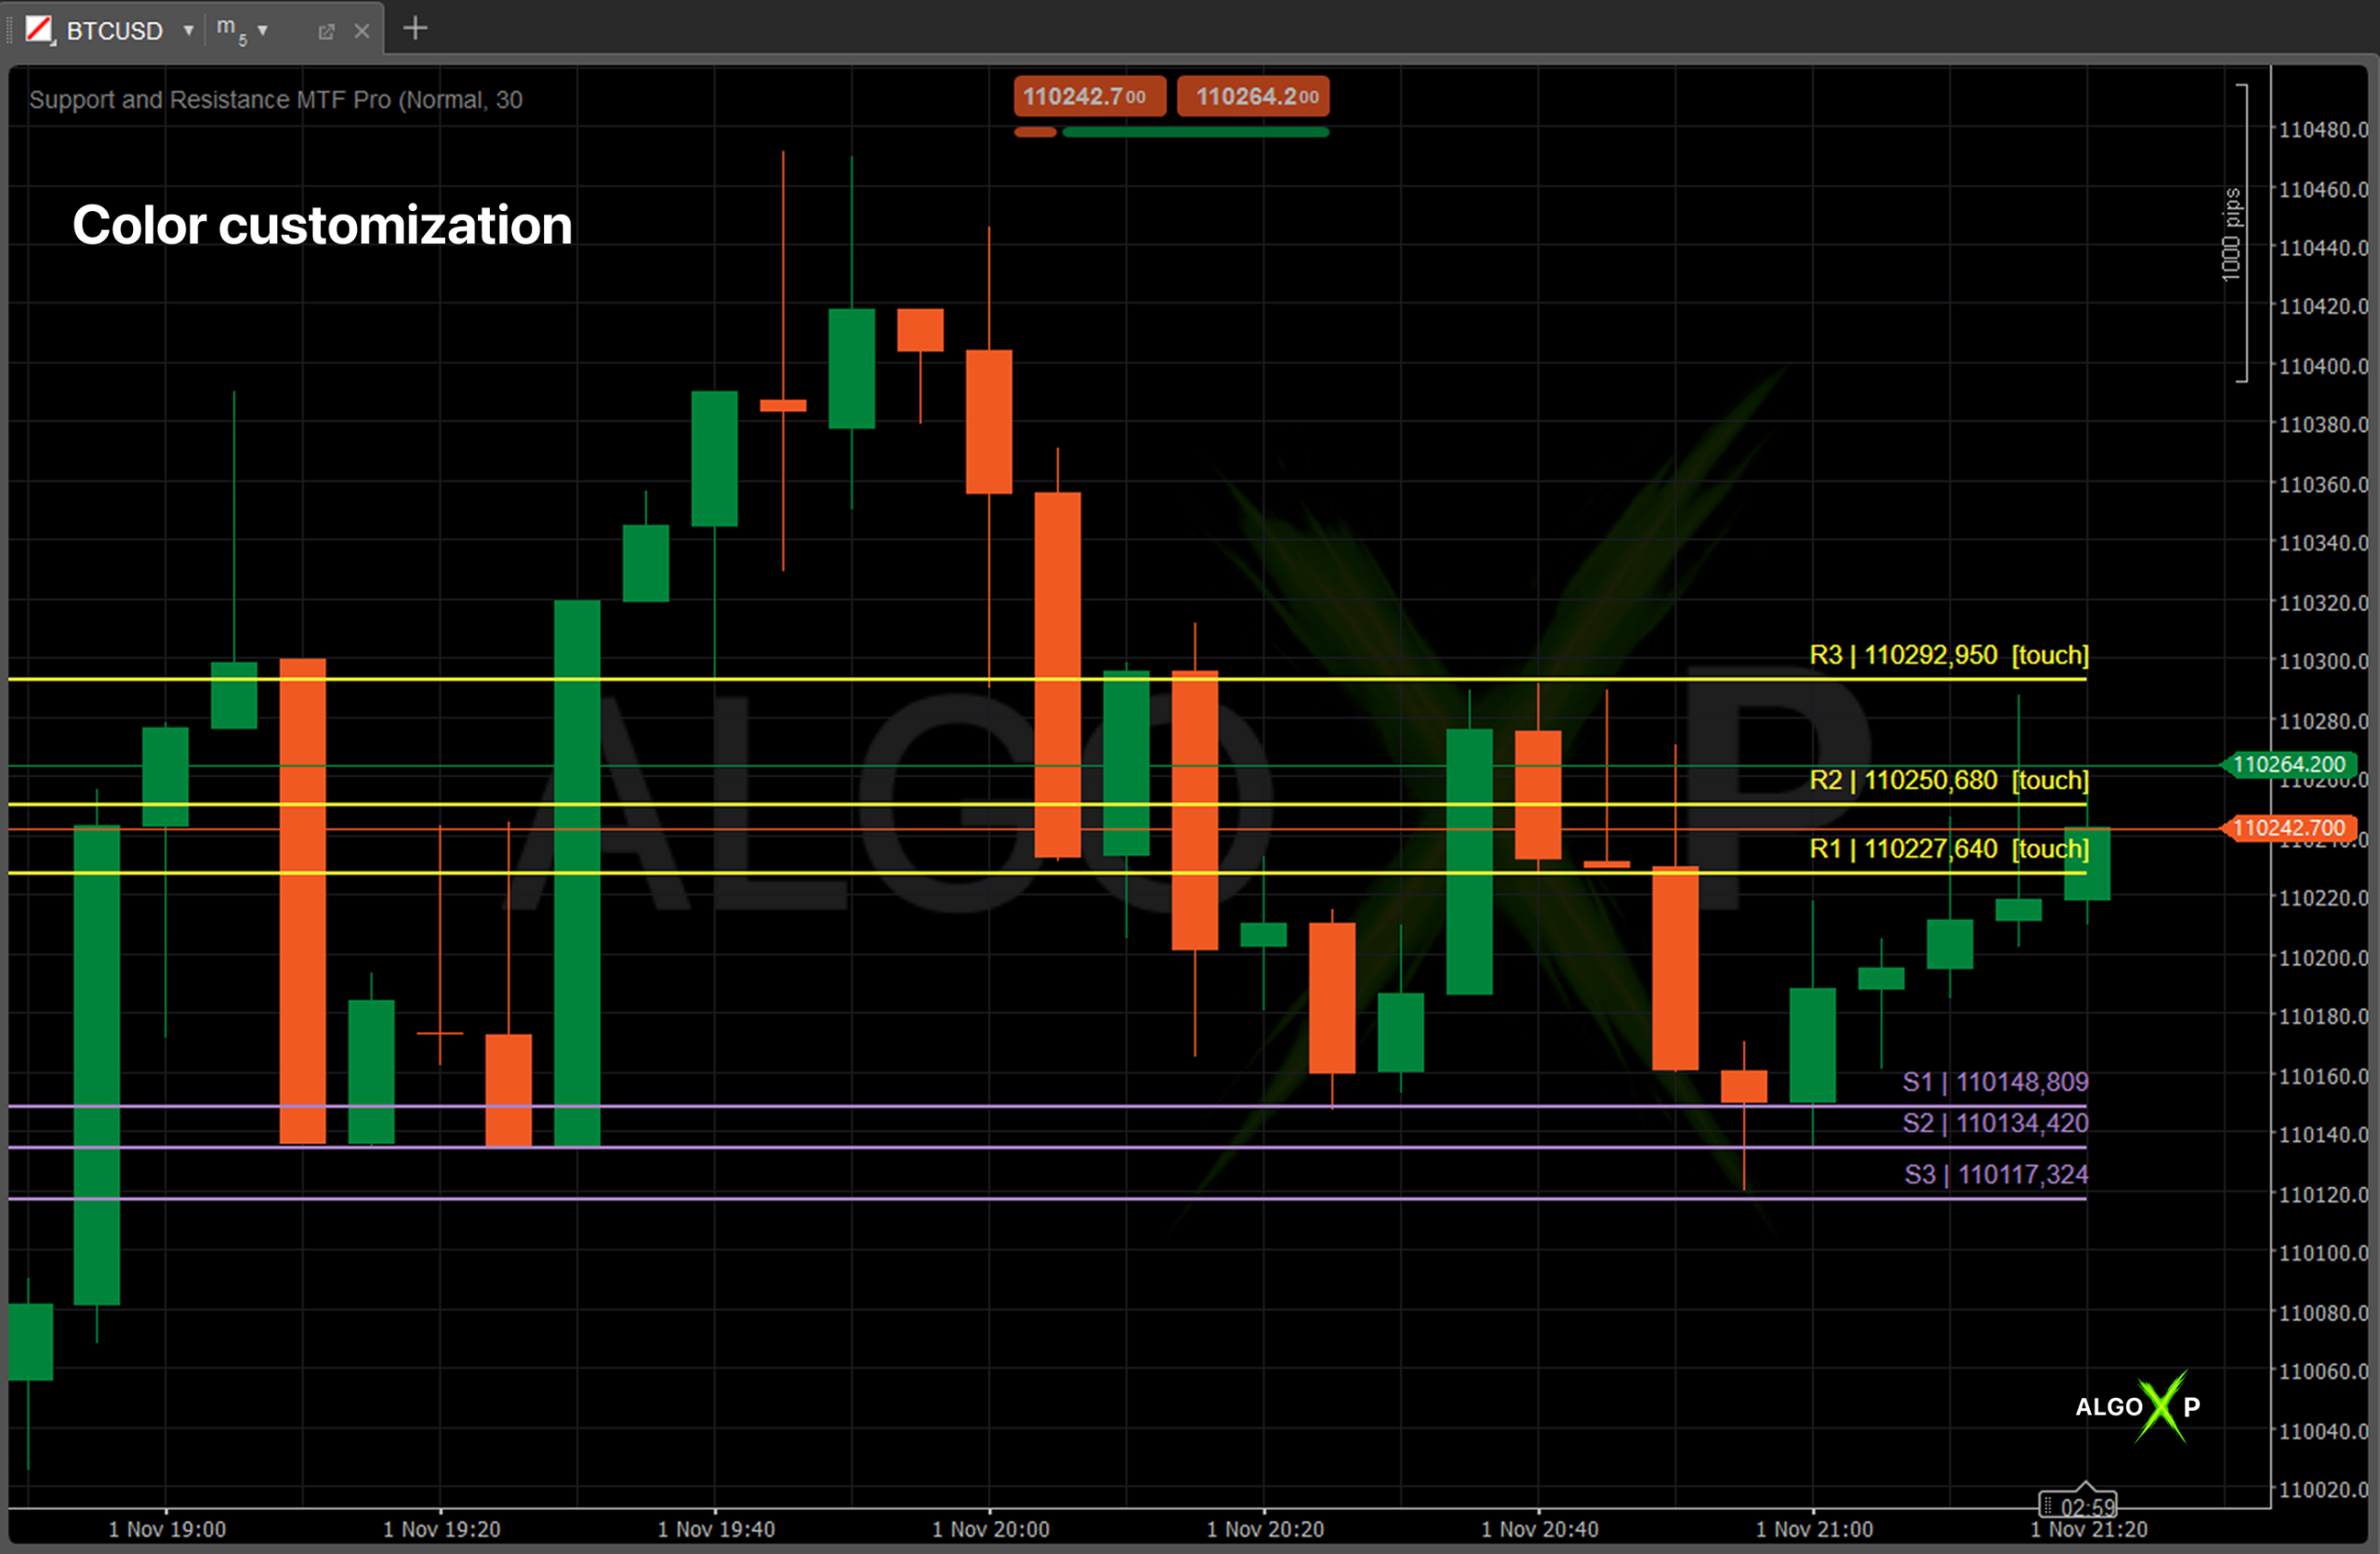
- Full visual control: custom colors for S/R and HTF lines; smooth, non-flicker drawing..
🎯 Perfect for:
- Price-action traders who rely on clean, trustworthy S/R structure (not formulaic lines).
- Intraday & swing traders who need consistent reading across symbols and timeframes.
- Crypto, metals, and indices traders who care about correct pips vs. tick/$ math and Bid/Ask choice.
- Systematic traders who filter by strength (touches), age (decay), and freshness (expiry).
- Anyone who wants fast, uncluttered charts with clear timing cues via nearest bands.
⚡ Why Pro?
- Sees the right levels faster and with less noise.
- MTF priority makes important levels obvious and consistent.
- Auto-numbering + HTF tags remove hesitation in live decisions.
- Two label modes fit both minimalists and data-driven traders.
- Bid/Ask distance and ATR context improve execution discipline.
- Performance-safe even on busy charts and lower timeframes.
Core controls set how zones are found and filtered: Pivot preset, Lookback Bars, Max Zones per Side, and Min Touches determine density and strength of S/R.
Context & visuals come from Use MTF + timeframe & per-side cap, Bands (ATR or Fixed width), Show Right Labels with Simple/Pro detail, Distance Price (Bid/Ask), Draw Back Bars, and color settings.
Stability & freshness are tuned via Decay (Half-Life) and Expiry, while HTF recalculation is performance-optimized to run only on the higher-TF bar close.
Support and Resistance MTF Pro – Parameters Overview
Core
- Pivot Length (preset)(Clean | Normal | Detailed, default: Normal)
Chooses swing sensitivity and merge tolerance under the hood.- Clean: Stricter pivots (L/R=3), wider merge tolerance → fewer, stronger zones.
- Normal: Balanced pivots (L/R=2), medium merge tolerance → recommended default.
- Detailed: More sensitive pivots (L/R=2) + tighter merge tolerance → more zones, finer structure.
Use when: - Clean for higher TFs or when you want fewer signals.
- Detailed for scalping or when you need denser S/R mapping.
- Lookback Bars
History depth scanned for pivots and touch-counts. More bars = more potential zones and heavier CPU.
Tip: 600–1200 is typically enough; increase for swing trading or sparse markets. - Max Zones per Side
Cap of support (below price) and resistance (above price) levels retained after ranking by strength.
Tip: Keep 2–4 for a clean chart; raise on higher TFs. - Min Touches to Validate
Minimum raw touches within a zone (top↔bottom) required to keep it.
Increase to show only robust, repeatedly respected zones.
Decrease to reveal early/younger levels.
Bands (Nearest S&R highlight)
- Show Band (Nearest S&R)(default: false)
Draws a semi-transparent “half-band” only on the nearest support and nearest resistance for timing clarity.- Support band: from Mid − Half to Mid
- Resistance band: from Mid to Mid + Half
- Band Width Mode(ATR | FixedPips, default: ATR)
Chooses how Half (half-width) of each zone is derived.- ATR: Half = ATR(14) × ATR Factor ÷ 2 → adaptive to volatility.
- FixedPips: Half = FixedPips × PipSize ÷ 2 → stable visual width across time.
- ATR Factor (Band Width)
Multiplier for ATR width when Band Width Mode = ATR.
Tip: 0.8–1.4 is a good working range depending on symbol volatility. - Fixed Band (pips)
Half-band in pips when Band Width Mode = FixedPips.
Tip: Pick values that reflect instrument scale (e.g., larger for indices/crypto).
View
- Draw Back Bars (lines depth)
How far to draw S/R lines into the past (visual depth). Does not affect detection logic.
Tip: Smaller for performance; larger if you want historical context visible. - Support Color
- Resistance Color
- HUD Color
Visual styling for lines/text. - Show HUD (default: true)
Toggles compact panel with mode info and live distances to nearest S/R (in pips and ~ATR).
Tip: Keep on during tuning; can be hidden after you’re comfortable.
Right Labels (on-chart level tags)
- Show Right Labels (default: true)
Places labels just to the right of the latest bar on each level line. - Right Label Mode(Simple | Pro, default: Pro)
Label content:- Simple:
S1 | 1.08340(orR1 | …) - Pro:
S1 | 1.08340 | 18.7p | 0.68ATR | ● x518.7p= distance from the selected Distance Price (see below) to the level0.68ATR≈ that distance relative to ATR(14)● x5= raw touch count used in ranking
- Simple:
- Distance Price(Bid | Ask, default: Bid)
Selects the reference price for pip distance/ATR multiple in the HUD and Pro labels.- Bid: typical for sell-side reference or neutral reading on FX.
- Ask: useful if you want distance from potential buy execution.
Note: ATR is always ATR(14) from the instrument; pips respectSymbol.PipSize.
MTF (Higher-Timeframe Zones)
- Use MTF Zones (default: false)
Enables detection of zones on a higher timeframe (HTF). HTF zones get priority: if an HTF zone overlaps an LTF zone (within ATR-based tolerance), the LTF zone is upgraded (HTF price/width/weight). - MTF TimeFrame (M1, M5, M15, M30, H1, H4, D1, W1 | default: H1)
- MTF Max Zones/Side (default: 2)
Same concept as LTF per-side cap, but for HTF zones before merging with LTF. - MTF Line Color
Color for HTF (upgraded or pure HTF) lines/labels.
MTF performance behavior:
- HTF swings/zones are recalculated only when the HTF bar closes. This avoids heavy, unnecessary updates every LTF tick while keeping HTF structure accurate.
Advanced (Aging & Expiry)
- Use Decay (aging) (default: false)
When ON, older touches count less: weight decays as0.5^(age / HalfLife).
Effect: recent reactions matter more when ranking zones. - Half-Life (bars) (default: 600)
Controls how fast touch weight halves. Lower = faster aging (recent behavior dominates). - Expire After (bars, 0=off) (default: 0)
Ignores touches older than this age during counting.
Tip: Use on fast markets to keep zones “fresh”.
Tips & interactions
- Nothing on chart?
Lower Min Touches, increase Lookback Bars, or switch to Detailed preset. Make sure the symbol’sPipSizeis correct in your platform (especially for crypto/indices). - Performance:
- Keep Lookback Bars reasonable (600–1200).
- Limit zones per side (2–4).
- MTF recalculates only on HTF close → safe to keep Use MTF ON.
- Bands draw only on nearest S & R to avoid clutter.
- Distance numbers differ from your broker’s idea of a “pip”?
The indicator uses the platform’sSymbol.PipSizefor conversion. For instruments like BTCUSD or indices, a “pip” may represent a different absolute value than classic FX — that’s correct by design. If you need different semantics, use Label Mode = Simple or interpret the “pips” as platform-pips. - When to use Ask as Distance Price:
When evaluating buy risk/immediacy in instruments with wider spreads (metals, crypto). For sell-side focus, Bid is typically fine.