
Inca Gold Grid AI Pro – Anchor-Controlled Smart Grid for XAUUSD & XAGUSD (cTrader)
✨ Inca Gold Grid AI Pro is a next-generation grid robot engineered specifically for Gold (XAUUSD) and Silver (XAGUSD) on cTrader.
This is not a random “set-and-forget grid”. Inca is a precision-controlled execution engine with full authority over where the grid is built (Anchor) and how it expands (Spacing) – so the strategy stays structured even when volatility and market regime shift.
At the core is an Anchor-Controlled Grid System: the bot continuously builds levels around a meaningful market reference (EMA / VWAP / Donchian / Hybrid), and applies ATR-adaptive spacing or progressive distance logic to keep the grid aligned with current conditions -instead of using a static step that breaks the moment volatility changes.
🚀 Key Features
🧠 Smart Engine (AI-Driven Automation)
- Volatility regime detection (Auto ATR Regime): adapts grid behavior in low / neutral / high volatility conditions.
- Auto direction (EMA-trend + deadzone filter): avoids “chop trading” by refusing to seed when the market is neutral.
📏 Adaptive Grid Spacing Control
Choose how the grid step is calculated:
- ATR Adaptive — volatility-ready dynamic step sizing.
- Fixed Pips — stable, repeatable spacing for controlled setups.
- Progressive — geometric widening/narrowing per level for smarter exposure distribution.
⚓ Advanced Anchor System (Grid Placement That Makes Sense)
Select the reference price the grid is built around:
- Entry Price, Session VWAP, Daily VWAP
- EMA Mean, Donchian Mid
- Hybrid (Entry + VWAP blend) for anchor stability during transitions.
🧭 Directional Grid Management
- Both / BuyOnly / SellOnly
- Auto Mode: chooses direction via EMA logic; if neutral, it can skip trading instead of forcing entries.
🧺 Smart Basket Control
- Basket TP by money or by pips vs average
- Basket CUT for fast drawdown control
- Optional behavior: after TP/CUT the bot stops trading until end-of-day (prevents immediate re-entry and overtrading).
🛡️ Key built-in risk controls include:
- Maximum holding time for losing positions
- Daily stop-loss limits and floating drawdown protection
- Free margin and volume safeguards
- Basket management (Take Profit or Cut) to close entire grids at once
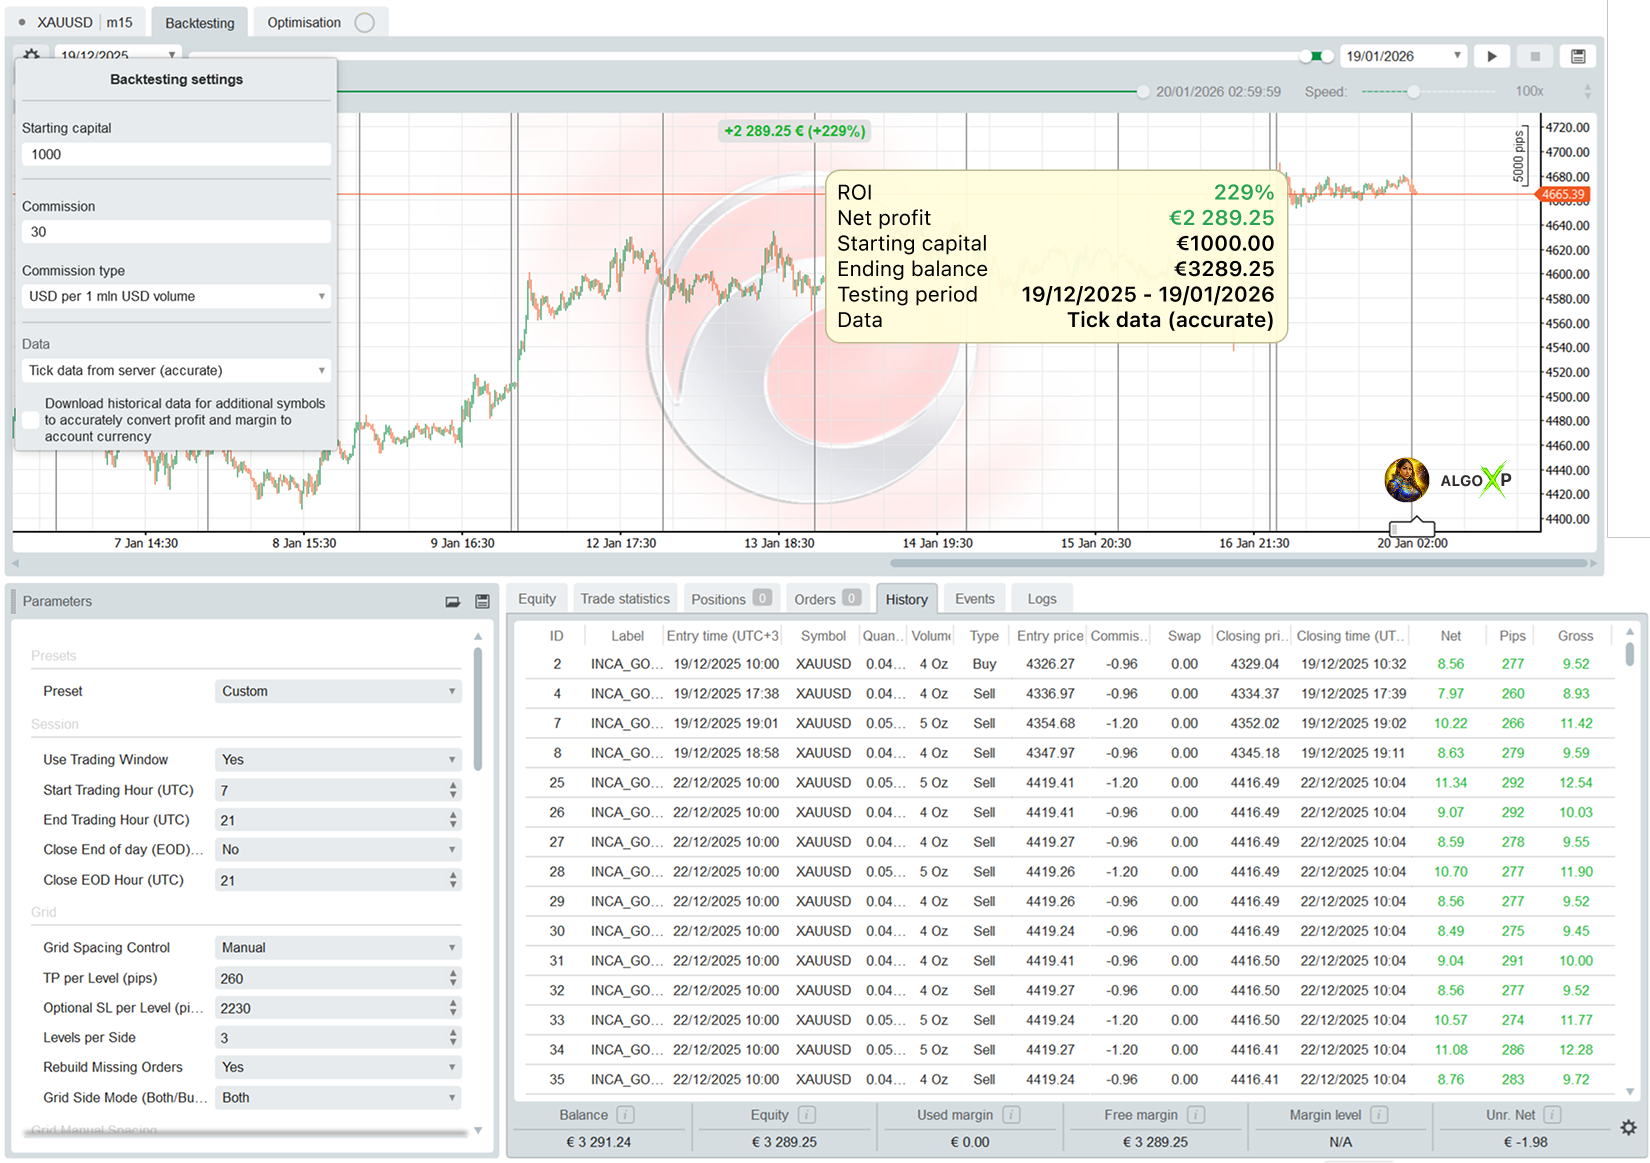
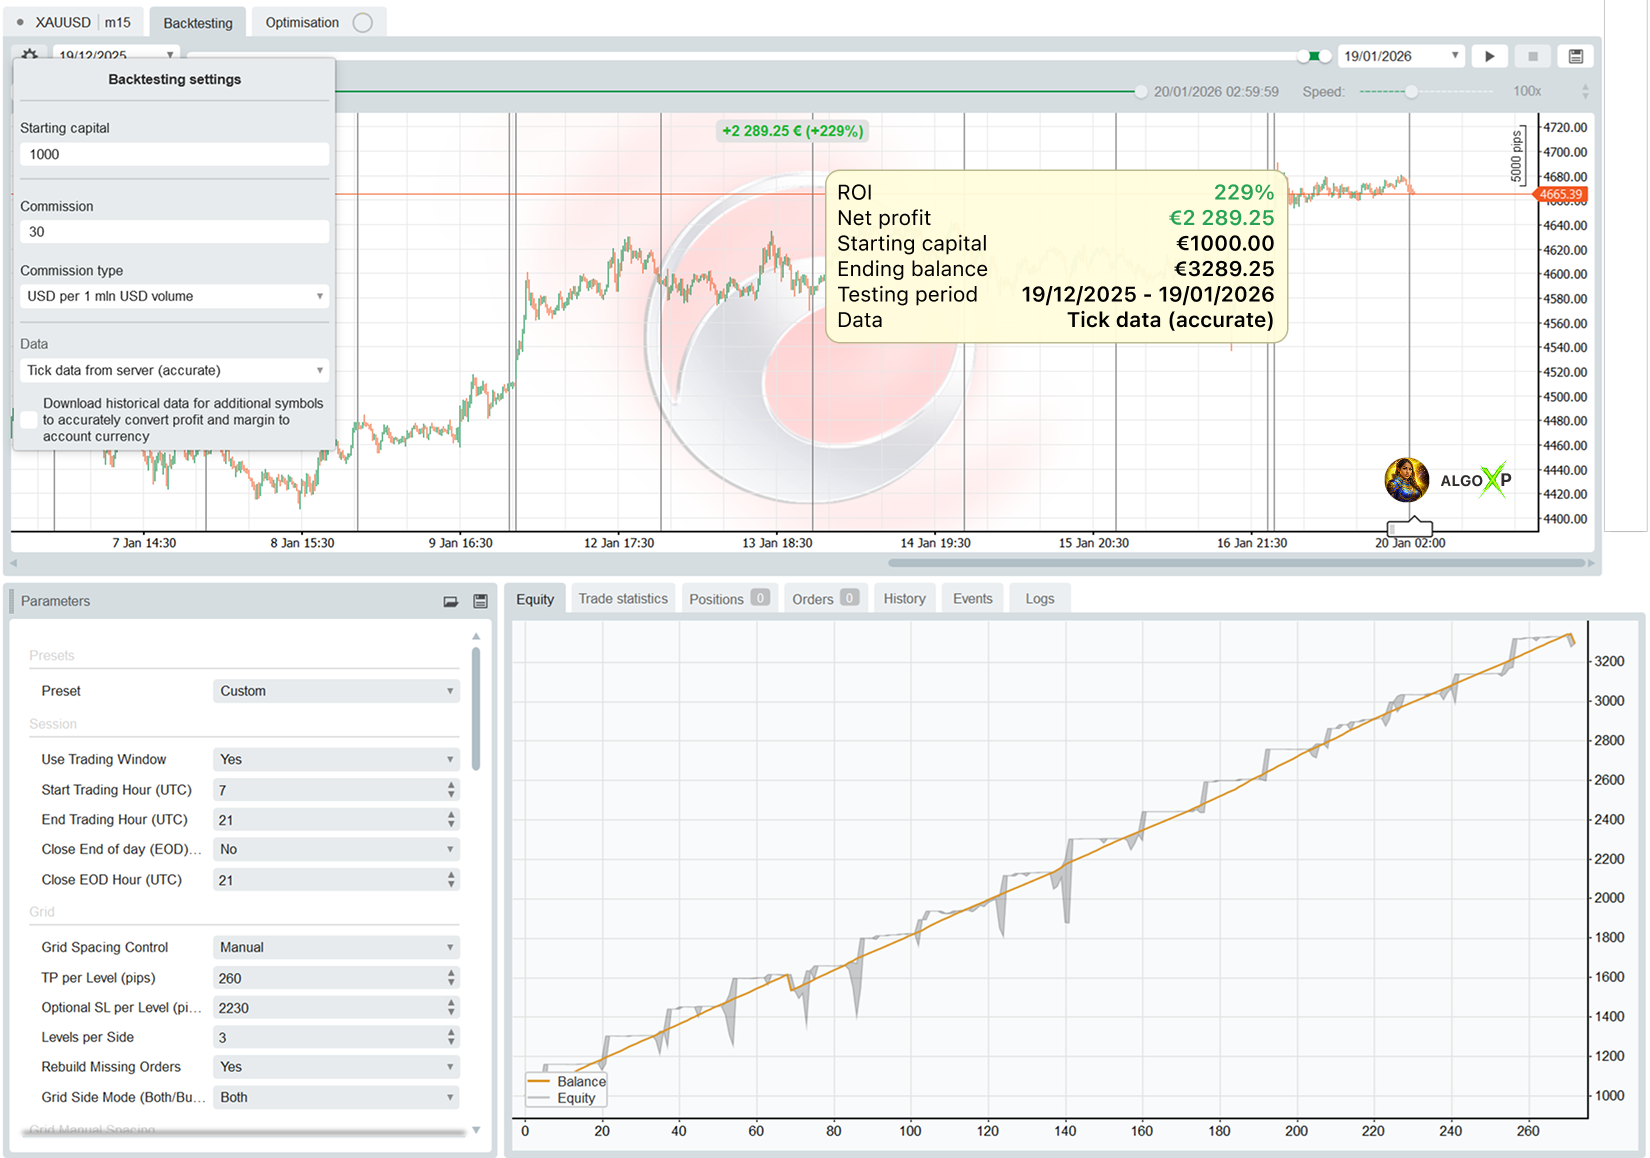
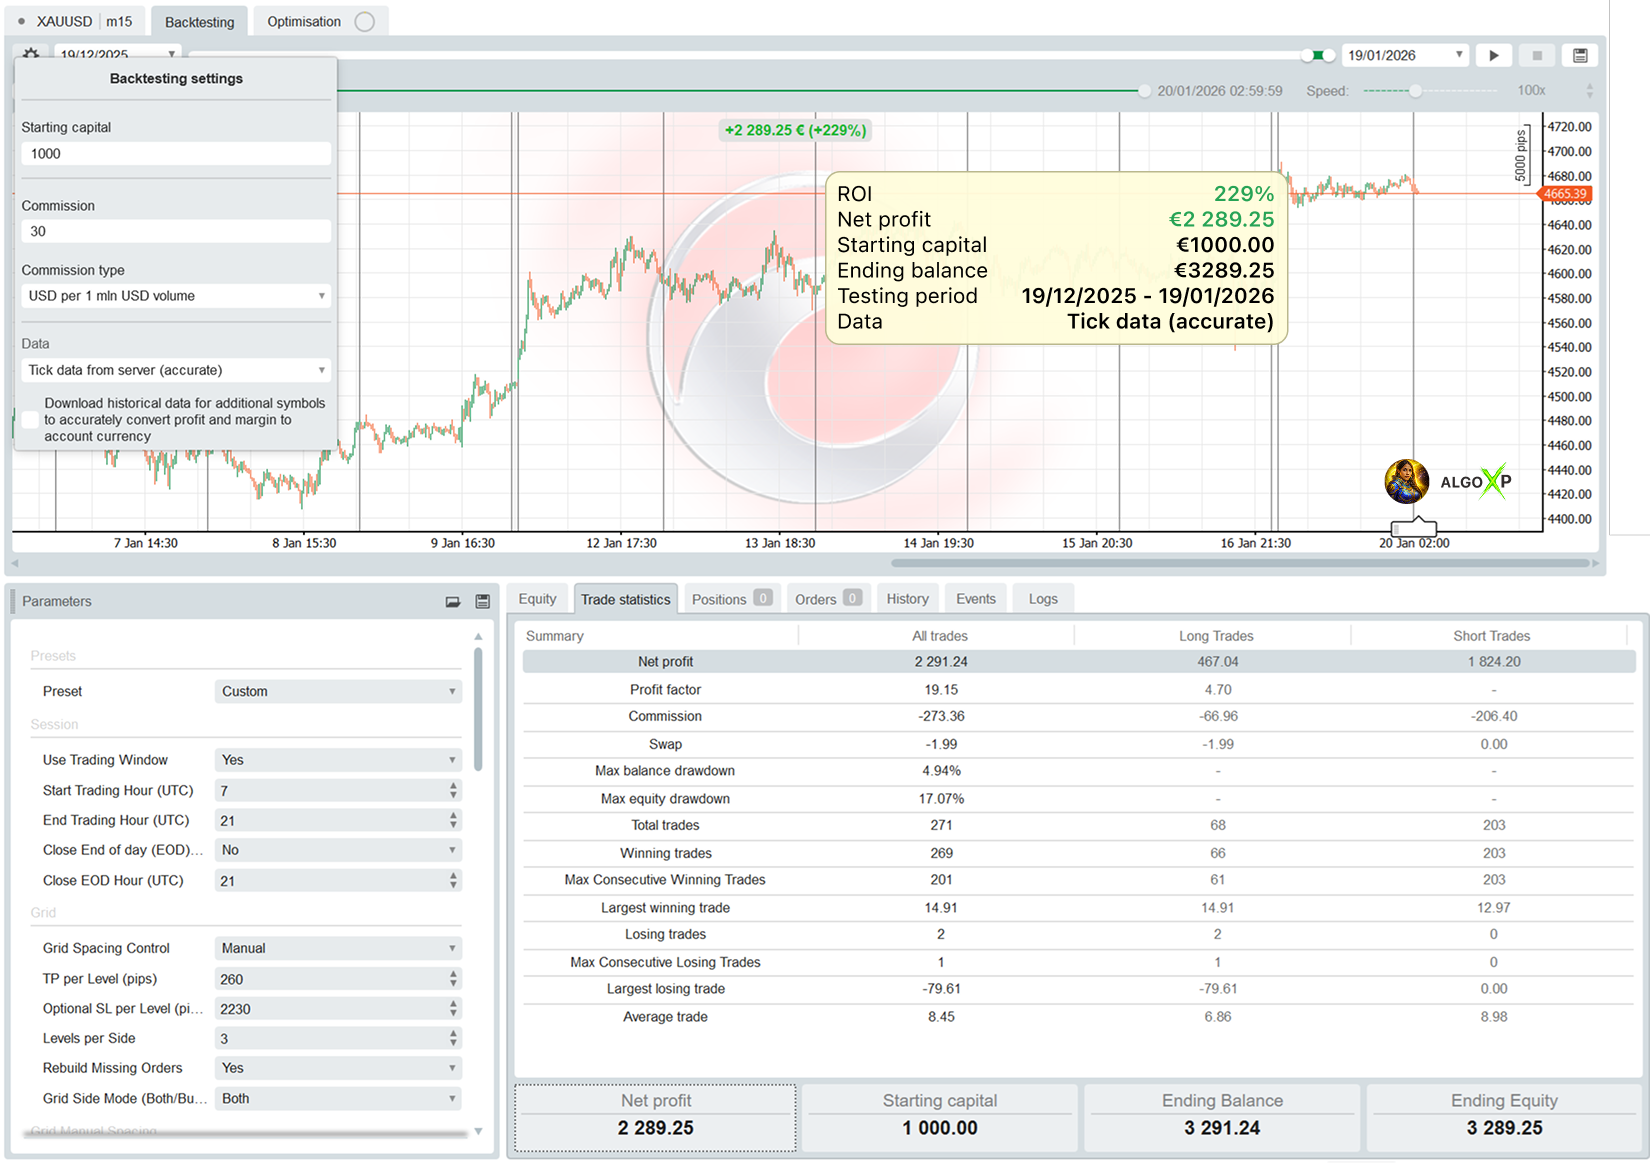
📊 Tested Performance
Based on 1-month tick-data backtests (internal testing):
- XAUUSD (Gold): +230% monthly
- XAGUSD (Silver): +50% monthly
Optimized on IC Markets tick data, designed for leverage 1:100+, and purpose-built for M15 grid dynamics with anchor-centered stability.
Trading involves risk. Backtests/optimizations show potential, not a guarantee. Real results depend on broker conditions (spread, commission, execution, leverage) and your settings. Always forward-test and optimize on tick data with your broker before going live.
Inca Gold Grid AI Pro offers a wide range of parameters grouped into logical sections for easier setup.
All settings can be applied automatically through optimized presets (Low Risk High Risk), or configured manually if you select the Custom preset, which unlocks full control over every parameter.
Inca Gold Grid AI Pro – Parameters Overview
Presets
Inca Gold Grid AI Pro offers a full professional parameter set grouped into clear sections for fast setup and precise control.
You can run it plug-and-play using optimized Presets, or switch to Custom for manual tuning (recommended when matching a specific broker/spread/leverage profile).
Key built-in control layers include:
- Volatility-adaptive spacing (Manual ATR / Fixed / Progressive, plus Auto ATR Regime)
- Anchor-based grid placement (EMA / VWAP / Donchian / Hybrid)
- Direction control (Both/Buy/Sell + Auto direction with EMA + deadzone)
- Basket management (TP/Cut + optional stop-trading until end of day)
- Risk guardrails (daily stop, equity DD circuit breaker, floating DD, margin buffer, max trades/day, max volume, spread filter)
All parameters below are applied only for Preset = ‘Custom’
Presets
Presets are ready-to-use configurations tuned for typical account conditions and risk styles.
They are designed to get you trading quickly with stable baseline logic.
- Custom — full manual configuration of all parameters (advanced users).
- LowRiskGold — wider safety margins, slower growth, smoother curve.
- HighRiskGold — faster cycle, higher exposure, deeper drawdowns.
- Silver — tuned for XAGUSD behavior and price scale.
Rule of thumb:
Lower risk preset → fewer “stress moments”, smaller swings.
Higher risk preset → more capture, but you must rely on risk guardrails.
Session
Controls when the bot is allowed to trade and how exposure is handled around daily boundaries.
Use Trading Window – restrict trading to a defined UTC session.
Impact: ON = cleaner execution (liquid hours), fewer random fills; OFF = more trades, more overnight exposure.
Start Trading Hour (UTC) – earlier start increases activity; later start reduces it.
Impact: earlier = more opportunities + more volatility events; later = fewer trades, often cleaner.
End Trading Hour (UTC) – earlier close reduces exposure; later close allows more grid cycles.
Impact: shorter window = more conservative; longer window = more profit potential + more risk time.
Session Exit Mode – defines what the bot does when the trading window ends (end-hour boundary).
Impact:
- Hold / Block Entries = keeps existing positions running, stops new entries → maximum profit continuity, higher carry risk.
- Close Positions = closes active positions at session end → cleaner daily exposure, may exit before basket completion.
- Close + Cancel Pendings = closes positions and removes grid/limit orders → strictest session discipline, avoids after-hours fills.
Close End of Day (EOD) (flatten) – closes all positions and pendings at EOD time.
Impact: strongest safety switch (no overnight holding), but may cut profitable baskets early.
Close EOD Hour (UTC) – defines the EOD flatten time.
Grid
Defines the grid’s profit mechanics: spacing, depth, per-level TP/SL, rebuild behavior, and side logic.
- TP per Level (pips) — per-position take profit.
Impact: lower TP = faster exits, more cycles; higher TP = fewer closes, higher profit per close. - SL per Level (pips) — per-position stop loss (0 = disabled).
Impact: smaller SL = less drawdown, but more “premature” stops; bigger SL = more tolerance, more risk. - Levels per Side — how deep the grid can scale per direction.
Impact: fewer levels = less exposure and faster reset; more levels = higher capture power but higher trend risk. - Rebuild Missing Orders — automatically restores missing pending levels.
Impact: ON = grid stays complete (more consistent behavior); OFF = manual control, less order activity. - Rebuild Mode (Classic/Trailing) — defines how the bot restores missing pending grid orders when Rebuild Missing Orders is ON.
- ClassicRebuildFromAnchor (Classic): Rebuilds the grid from the current anchor, refilling missing orders up to Levels per Side (may rescan from L1 and backfill gaps).
- TrailingExtendFromLast (Trailing): Extends the grid forward only, placing new levels beyond the last placed level (Lmax+1, Lmax+2…), while keeping Levels per Side pending orders per active side.
- Skip Passed Levels (Anti-Instant Fill) — prevents the bot from placing limit orders at prices the market has already crossed (or too close to current Bid/Ask), reducing accidental instant fills, slippage spikes, and “dirty” grid placement after fast moves.
Impact: ON = cleaner execution + more realistic grid around the anchor. OFF = maximum grid coverage but higher chance of immediate fills in volatile moments. - Grid Side Mode (Both/Buy/Sell/Auto)
- Both — classic two-sided grid around anchor
- BuyOnly / SellOnly — directional grid
- Auto — trend-filtered direction using EMA slope + deadzone (can skip flat conditions)
Impact: Both = more fills, more exposure; Directional/Auto = cleaner, more “trend-respecting” behavior.
Grid Spacing Control
This is where Inca becomes “smart”: you control how spacing is chosen.
Grid Spacing Control
- Manual — spacing is exactly what you choose (ATR / Fixed / Progressive).
Impact: predictable behavior for optimization and stable setups. - AutoAtrRegime — the bot switches spacing behavior based on volatility regime (low/neutral/high).
Impact: more robust when volatility shifts (especially gold news spikes), less need to babysit spacing.
Grid Manual Spacing
Grid Spacing Mode
- AtrAdaptive — step is calculated from ATR × multiplier.
Impact: adapts naturally to changing volatility (recommended baseline for XAUUSD). - FixedPips — fixed grid step.
Impact: very predictable, but can become too tight in high volatility or too wide in low volatility. - Progressive — distance grows/shrinks by a geometric factor per level.
Impact: lets you shape exposure: widen deeper levels to reduce “runaway density”, or tighten in calm regimes.
Parameters
- ATR Period — ATR lookback.
Impact: shorter = more reactive spacing; longer = smoother and slower adjustments. - ATR Multiplier → Step — multiplies ATR into step size.
Impact: lower = tighter grid (more trades, higher risk); higher = wider grid (fewer trades, safer). - Fixed Grid Step (pips) — used only in Fixed mode.
Impact: lower = more fills + more exposure; higher = less activity + more safety. - Spacing Growth Factor (g) — used only in Progressive mode.
Impact:- g > 1 = wider spacing deeper into grid (safer under pressure, slower recovery)
- g < 1 = tighter spacing deeper into grid (faster averaging, higher risk)
Grid Auto Spacing (ATR Regime Engine)
This block makes the spacing “regime-aware”: Inca compares current ATR to its average and chooses the effective mode.
- Regime Lookback (bars) — baseline ATR window for comparison.
Impact: smaller = faster regime switching; larger = more stable regime detection. - Low Vol Ratio (<=) — threshold for “low volatility”.
Impact: more sensitive (closer to 1.0) = more time in low-vol mode; lower threshold = stricter low-vol classification. - High Vol Ratio (>=) — threshold for “high volatility”.
Impact: lower threshold = triggers wide mode more often; higher threshold = only widens in true spikes. - Narrowing g (<1) — progressive factor used in low volatility mode.
Impact: tightens/compacts the grid behavior when the market is calm. - Widening g (>1) — progressive factor used in high volatility mode.
Impact: widens spacing under stress to reduce dense stacking. - Neutral Mode — what happens between low/high (mid regime).
- AtrAdaptive = balanced adaptive behavior
- FixedPips = stable/constant mid-regime spacing
- Log Regime Changes — prints regime switches.
Impact: useful for debugging and optimization reviews.
Anchor
Anchor defines where the grid is centered. This is a key “professional” component: you are not building around randomness — you’re building around a market reference.
- Anchor Mode
- EntryPrice — uses basket average entry (when flat uses current price).
Impact: grid stays centered on real exposure. - SessionVWAP — anchors to VWAP since session start.
Impact: great for intraday structure. - DailyVWAP — anchors to VWAP since day start.
Impact: more stable reference across the day. - EmaMean — anchors to EMA mean-reversion center.
Impact: “mean” framework; helps avoid drifting anchor. - DonchianMid — anchors to mid of Donchian range.
Impact: range-based reference. - HybridEntryVwap — blend between Entry and VWAP.
Impact: smoother transitions when exposure changes.
- EntryPrice — uses basket average entry (when flat uses current price).
- Anchor EMA Period — EMA period for EmaMean anchor.
Impact: smaller = faster anchor movement; larger = slower, more stable anchor. - Donchian Period — lookback for Donchian range.
Impact: smaller = more reactive; larger = more structural. - Hybrid Entry Weight (%) — weighting between Entry and VWAP (0 = all VWAP, 100 = all Entry).
Impact: higher Entry weight = tighter link to basket; higher VWAP weight = more “market reference”. - Log Anchor on Build — prints anchor used when grid is built/rebuilt.
Impact_REL: visibility for optimizations and live debugging.
Volume
Controls how exposure scales across levels — and this is one of the biggest drivers of drawdown behavior.
- Base Volume (lots) — initial size.
Impact: smaller = safer and smoother; larger = faster PnL swings. - Max Total Volume (lots) — hard cap on total exposure (positions + pendings).
Impact: your main “circuit breaker” against runaway grids. Lower cap = safer. - Volume Multiplier per Level — geometric scaling per level.
Impact:- closer to 1.0 = slow scaling (safer)
- higher values = faster scaling (more recovery power, more risk)
Seed
Seed rules control how the bot starts a new grid cycle when it’s flat.
- Auto Seed When Flat — opens a seed trade if there are no positions and no pendings.
Impact: ensures the strategy actually starts; turning it OFF makes the bot more passive. - Seed Only Inside Session — seeding happens only during session window.
Impact: avoids “random” off-hour starts.
(When GridSide = Auto, seeding is aligned with the resolved direction; neutral conditions can be skipped.)
Basket
Basket logic is your “professional exit layer”: it manages the grid as a system, not as random single trades.
- Basket TP (money) — closes the entire basket when combined profit reaches X money.
Impact: very clear and stable target behavior across volatility. - Basket TP (pips vs avg) — closes basket when price moves X pips away from VWAP/average while basket is positive.
Impact: adapts profit-taking to movement rather than currency value. - Close Losing Basket at -Money (Basket CUT) — closes basket when loss reaches X money.
Impact: hard stop to prevent “hope mode” in trends.
Important behavior: after Basket TP/CUT, the bot can stop trading until end of day (prevents immediate re-entry and overtrading).
Risk Management
- Max Trades Per Day — limits daily trade openings.
Impact: reduces churn and overtrading in noisy days. - Daily Loss Limit (%) — daily stop based on balance change from day start.
Impact: strong daily protection; lower values = safer but may stop too early. - Max Drawdown (Start Equity) (%) — equity circuit breaker from start equity.
Impact: “hard kill-switch” if equity falls too far — maximum safety layer.
Risk Management Pro
- Floating Drawdown Limit (%) — stops when open DD exceeds threshold (Equity vs Balance).
Impact: reduces runaway floating loss in trends. - Min Free Margin After Order (%) — margin buffer required after placing a new order.
Impact: prevents margin collapse during expansion (very important for grids). - Time Stop (Losing Positions) — optionally closes losing positions after a time limit.
Impact: reduces “stale” exposure and long-held losers; can cut recoveries if too aggressive. - Max Holding Time (min) — time limit for the loss time-stop.
Impact: smaller = stricter cleanup; larger = gives grid time to recover.
Execution
- Max Spread (pips, 0=off) — blocks trading when spread is too wide.
Impact: protects entries during illiquid spikes; can reduce activity. - On Max Spread
- BlockNewOrders — pauses new orders, keeps pendings.
- BlockNewAndCancelPendings — cancels pendings and waits until spread normalizes.
Impact: second option is stricter and cleaner in news/spread events.
General
- Label — trade label for basket tracking and multi-instance separation.
Impact: must be unique per instance if you run multiple bots on the same account/symbol.
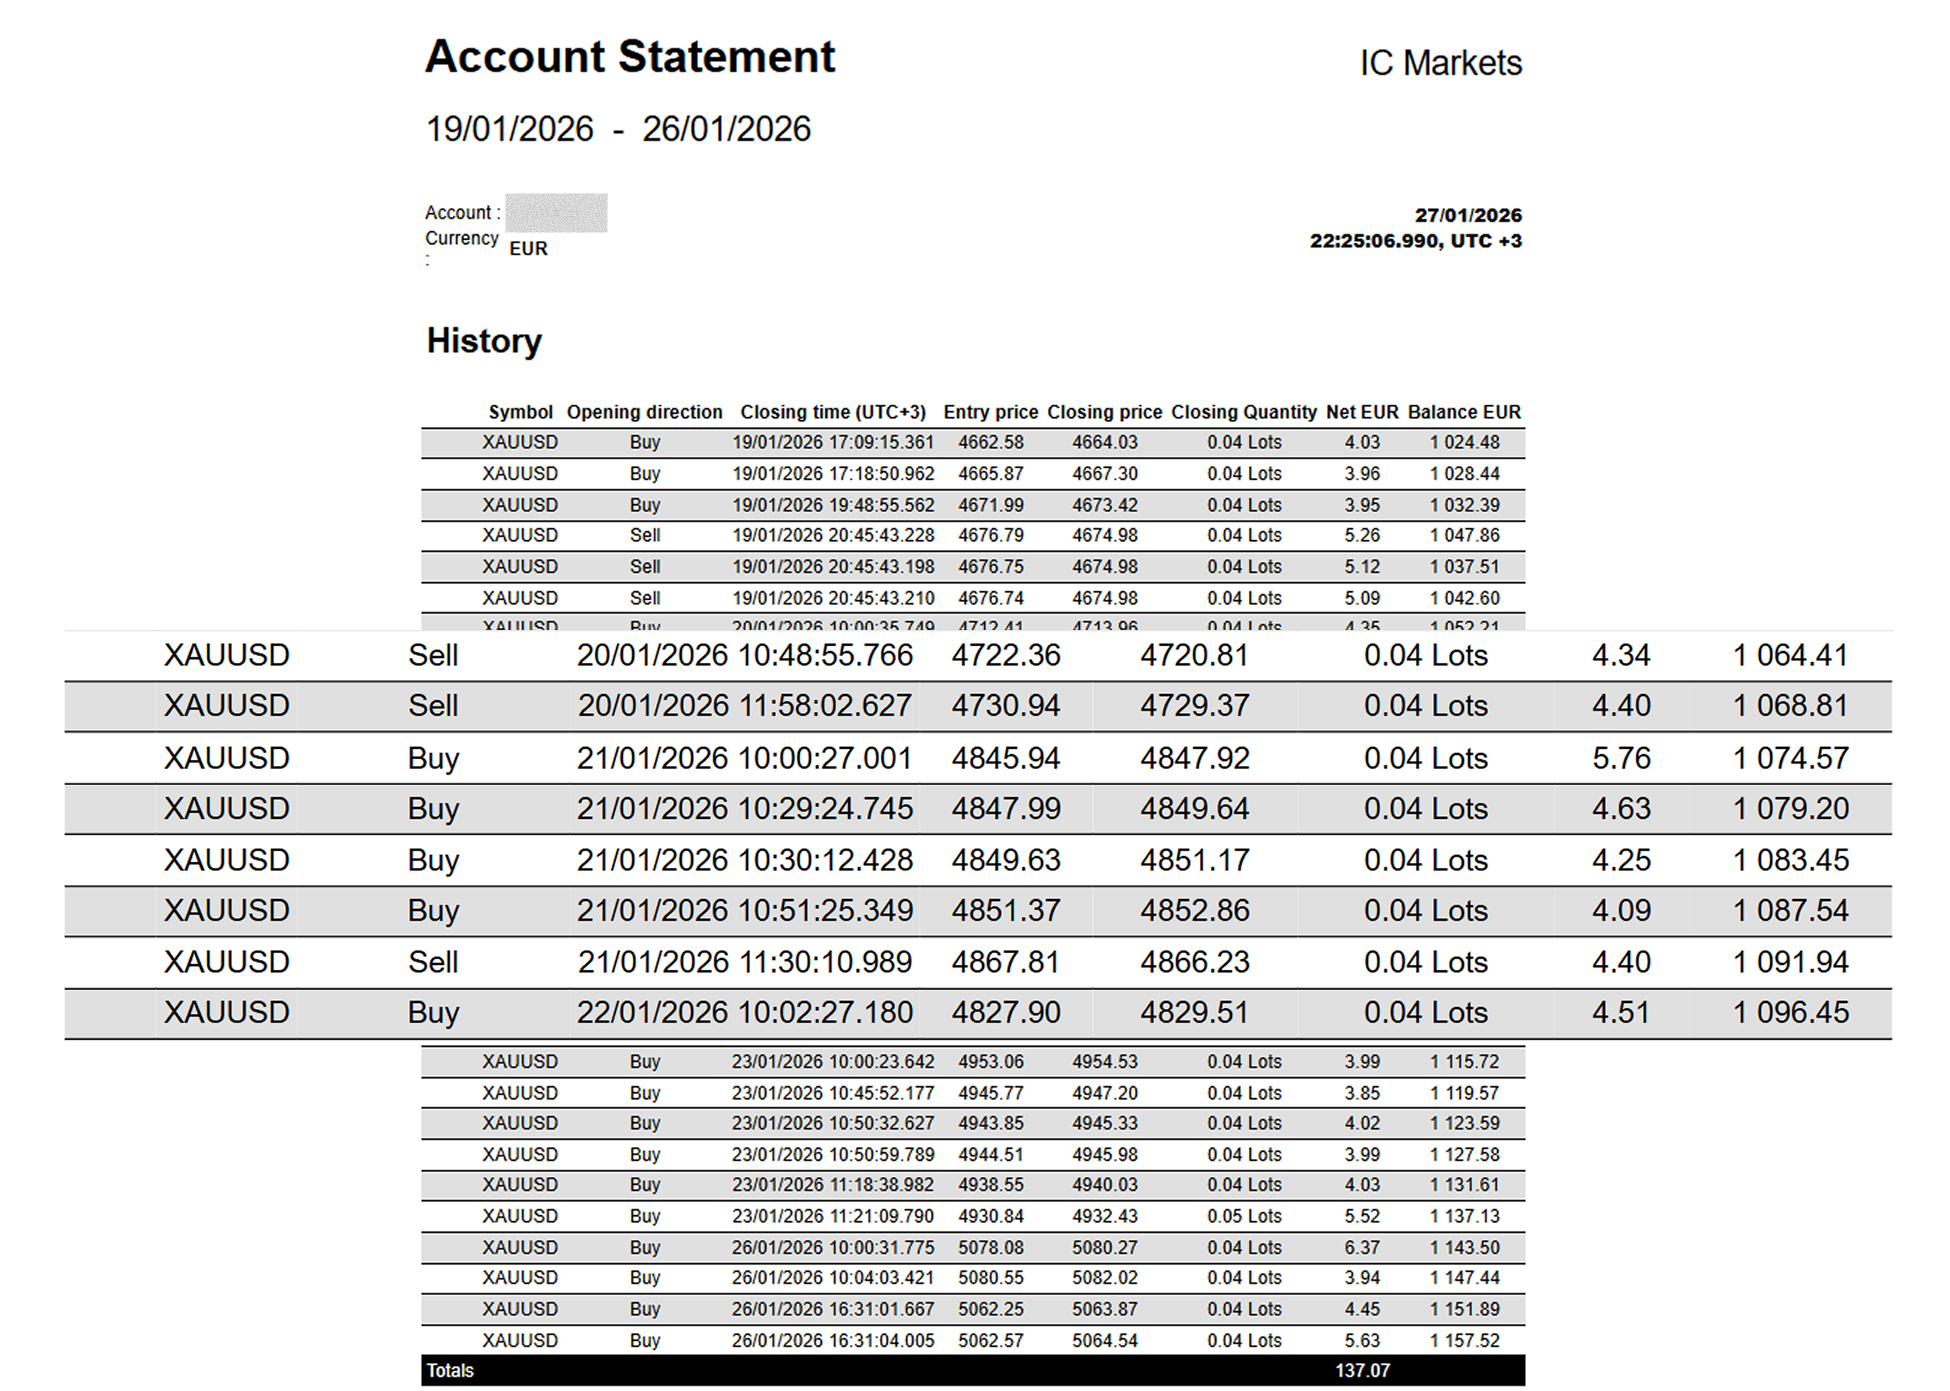
Backtesting on Ticks for 1 months 19/12/2025 – 19/01/2026
Equity
Trade statistics
History