🎱Support & Resistance MTF Pro — Professional S/R Zones for cTrader 🎱
Support & Resistance MTF Pro builds real market zones from swing (pivot) highs/lows, smart-merges nearby extremes, ranks them by strength, and auto-numbers them as S1/S2… R1/R2….
Unlike the Lite version, the Pro edition adds Higher-Timeframe (MTF) zones with priority over lower TF, rich label modes (Simple / Pro), Bid/Ask choice for distance, decay & expiry filters, and performance-tuned HTF recalculation (only on HTF bar close). Optional ATR/Fixed half-bands highlight just the nearest S & R for ultra-clear execution.
It’s the advanced version of our popular S/R engine — now with cleaner visuals, faster reads, and deeper control.
✅ Main Features:
- MTF priority zones: higher-timeframe levels upgrade overlapping lower-TF zones (price, width, weight).
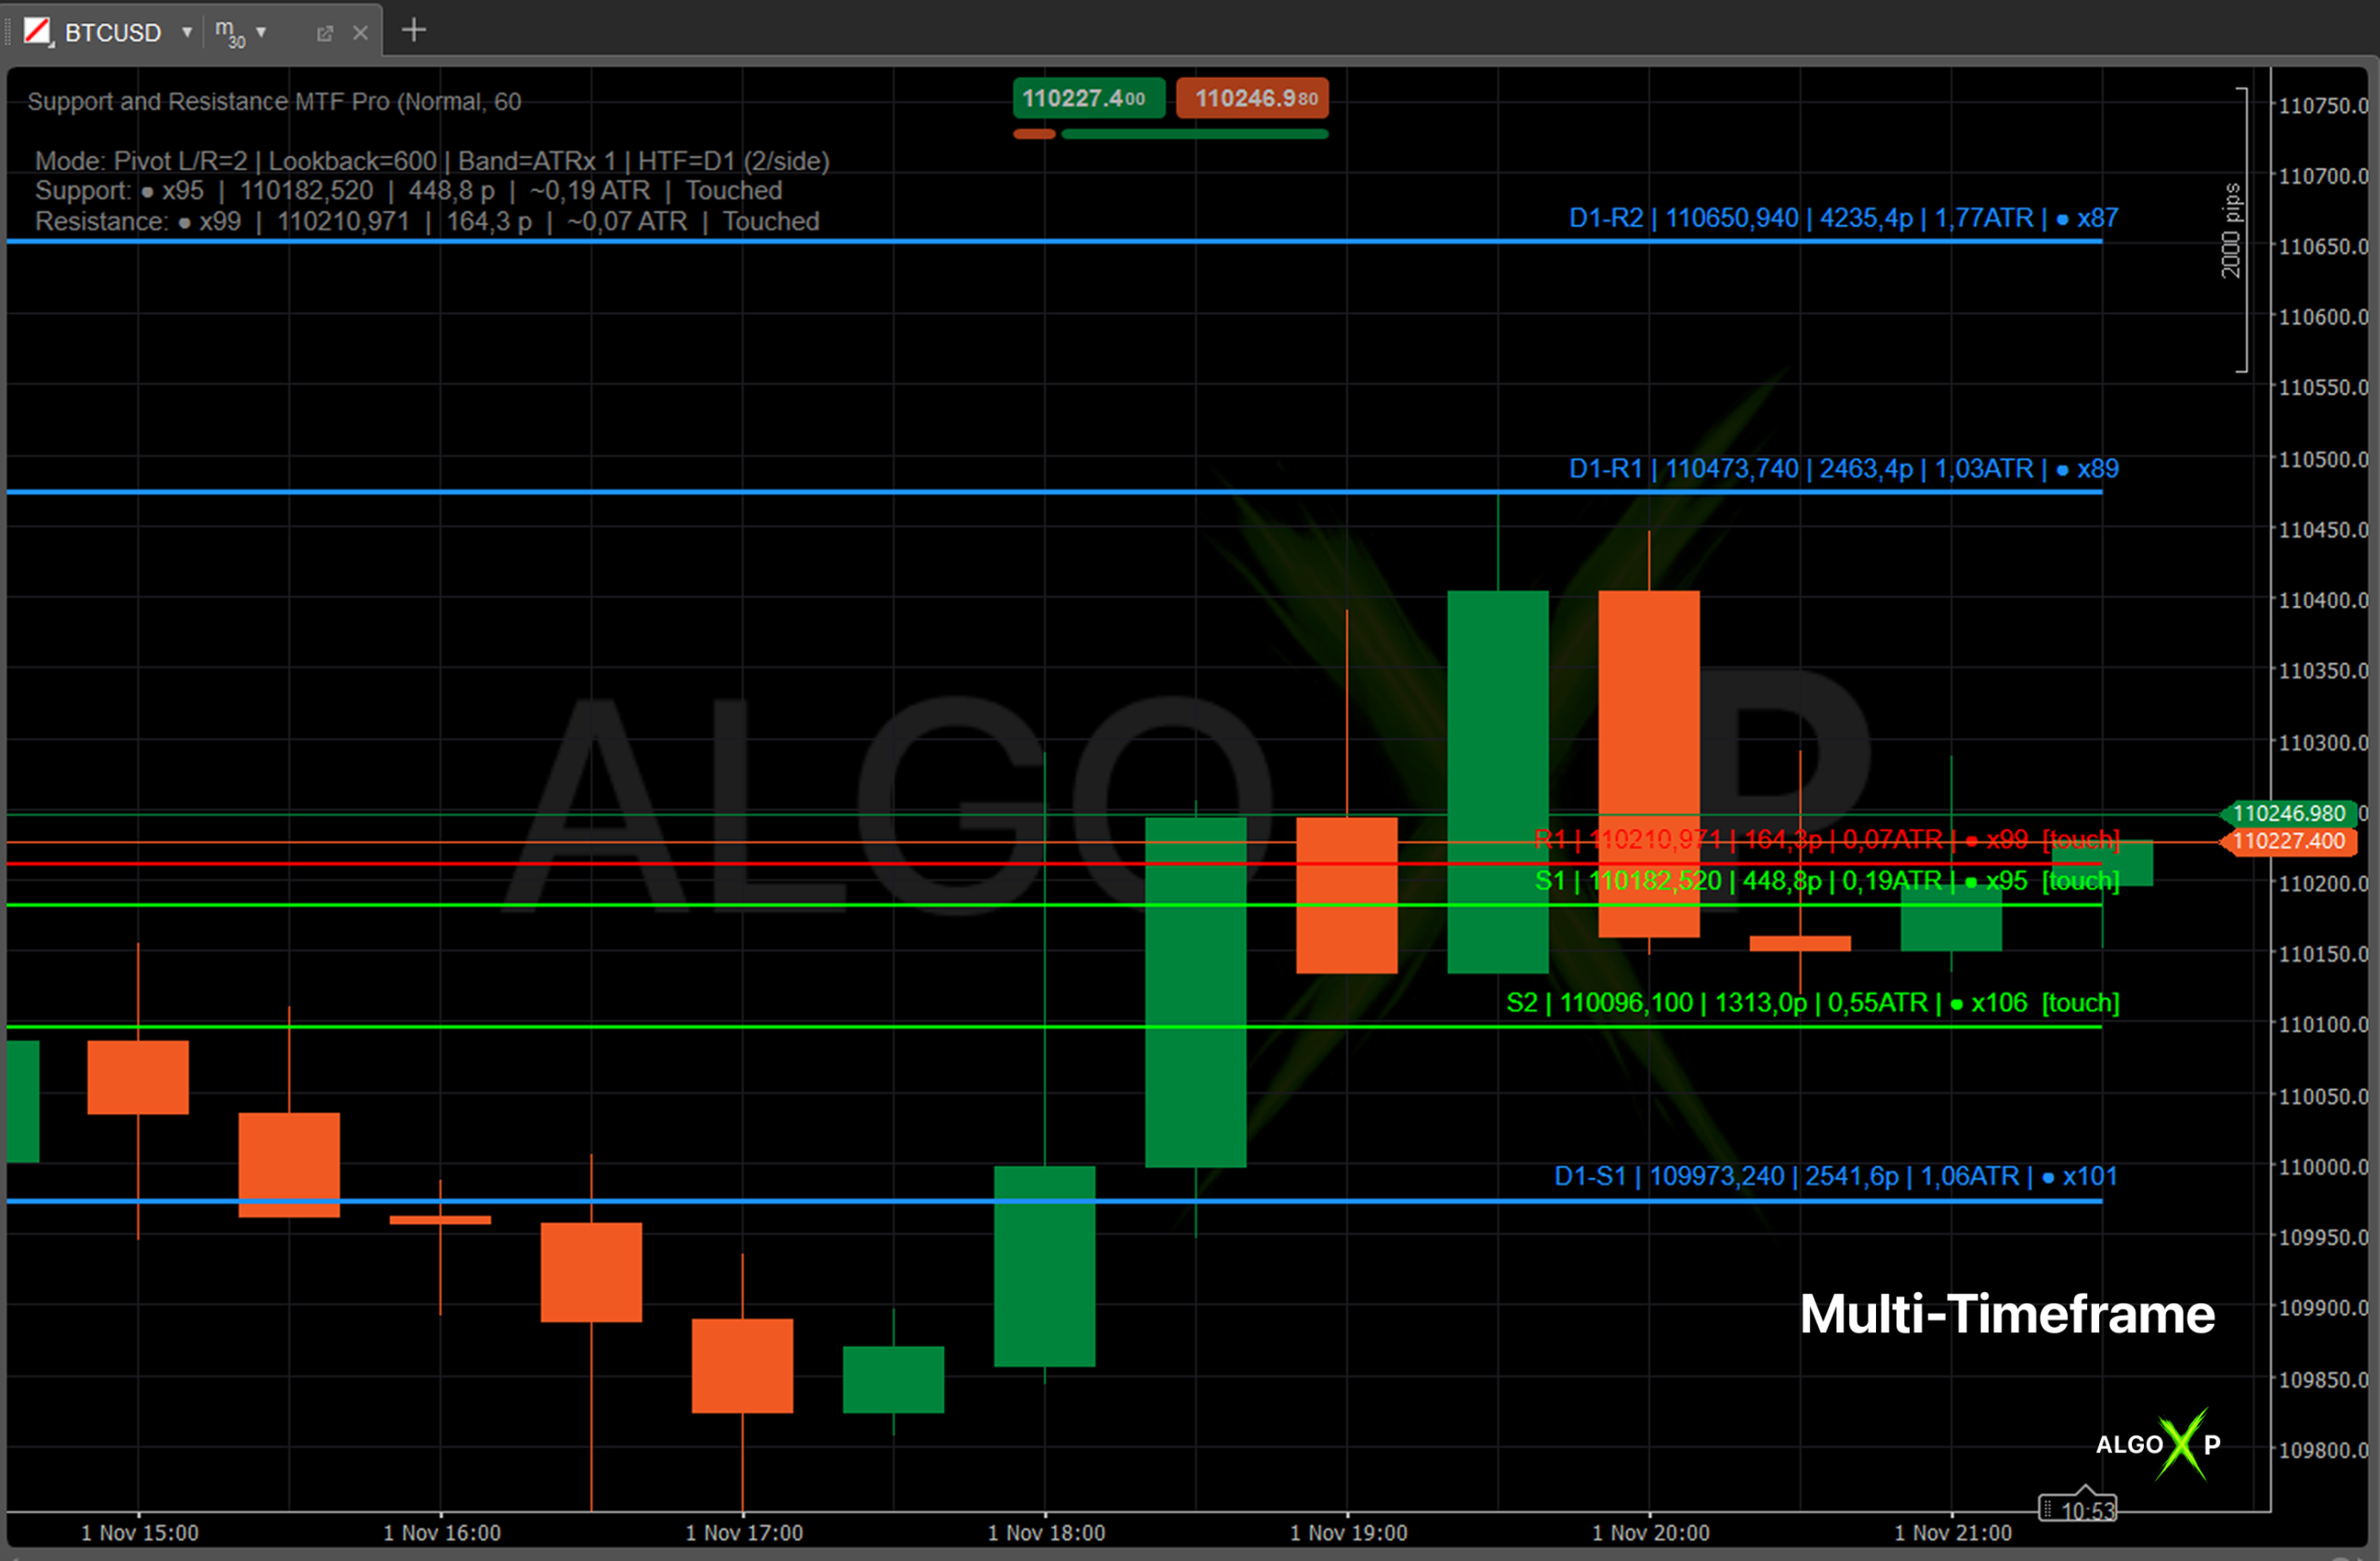
- Auto-numbered levels: S1/S2… R1/R2… with HTF prefixes (e.g., H1-S1, D1-R1) for instant orientation.
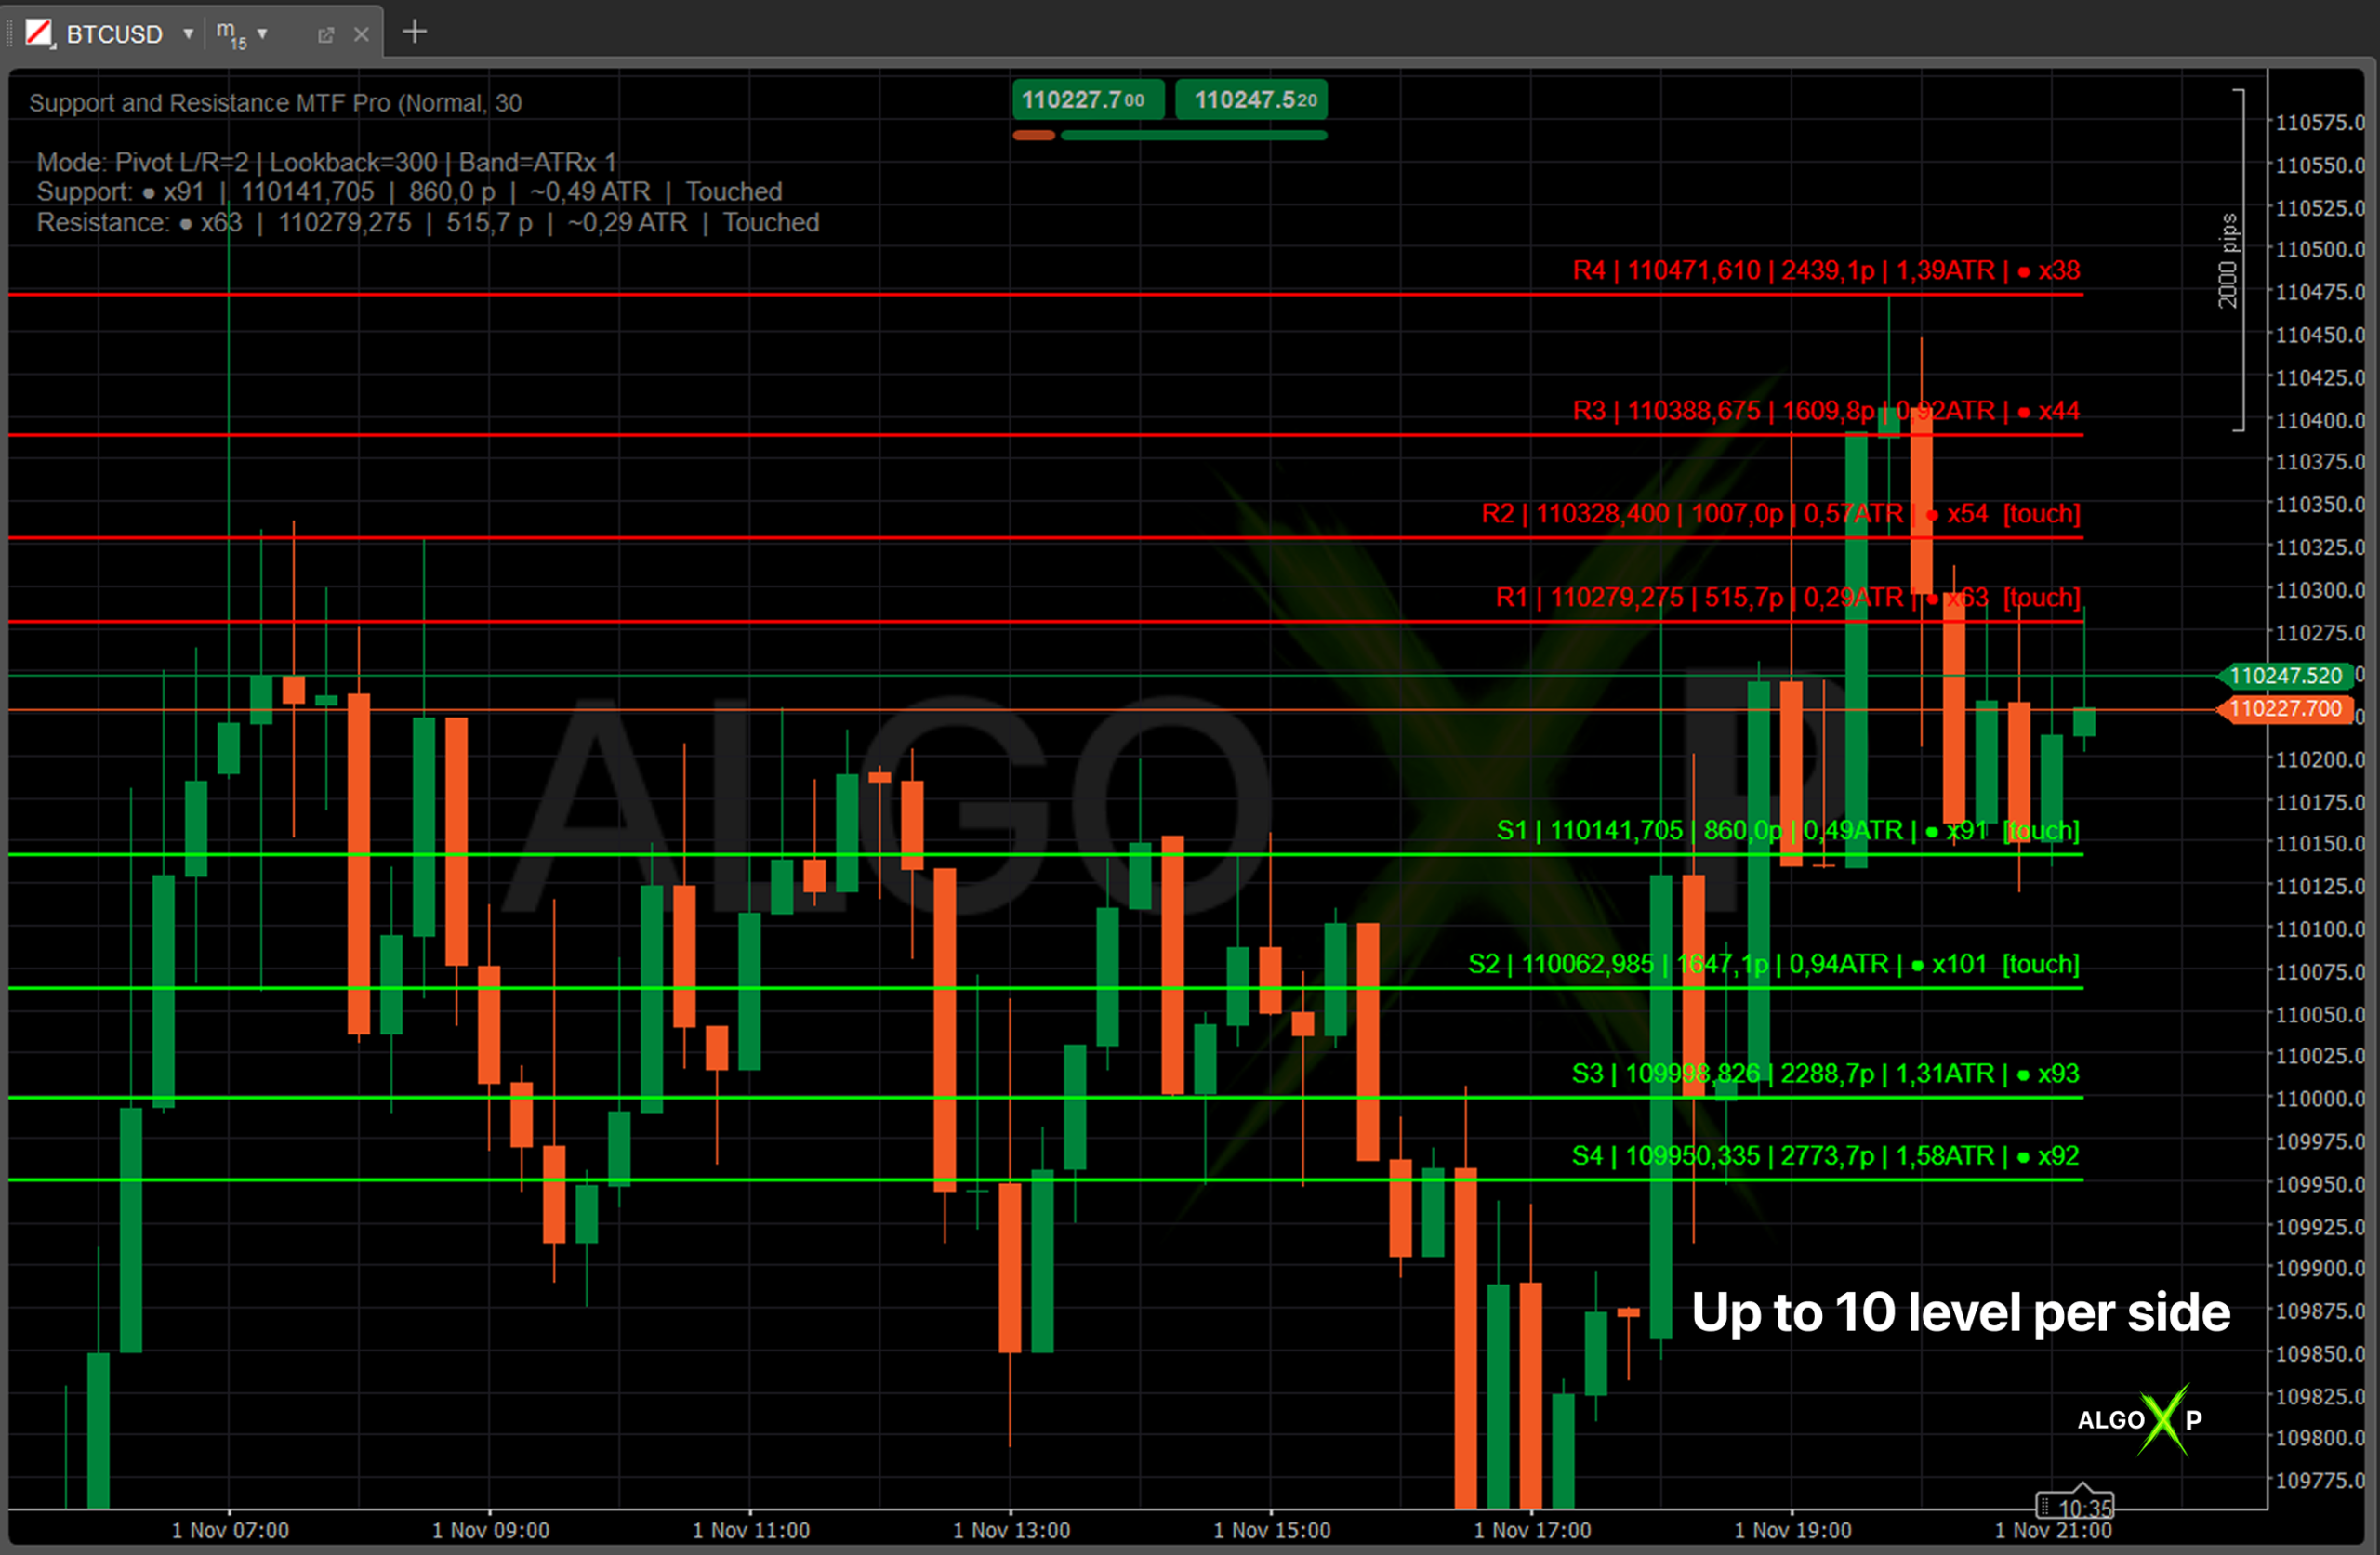
- Swing-true detection: zones from actual pivots; smart merge; per-side cap (up to 10) keeps charts clean.
- Two label modes:
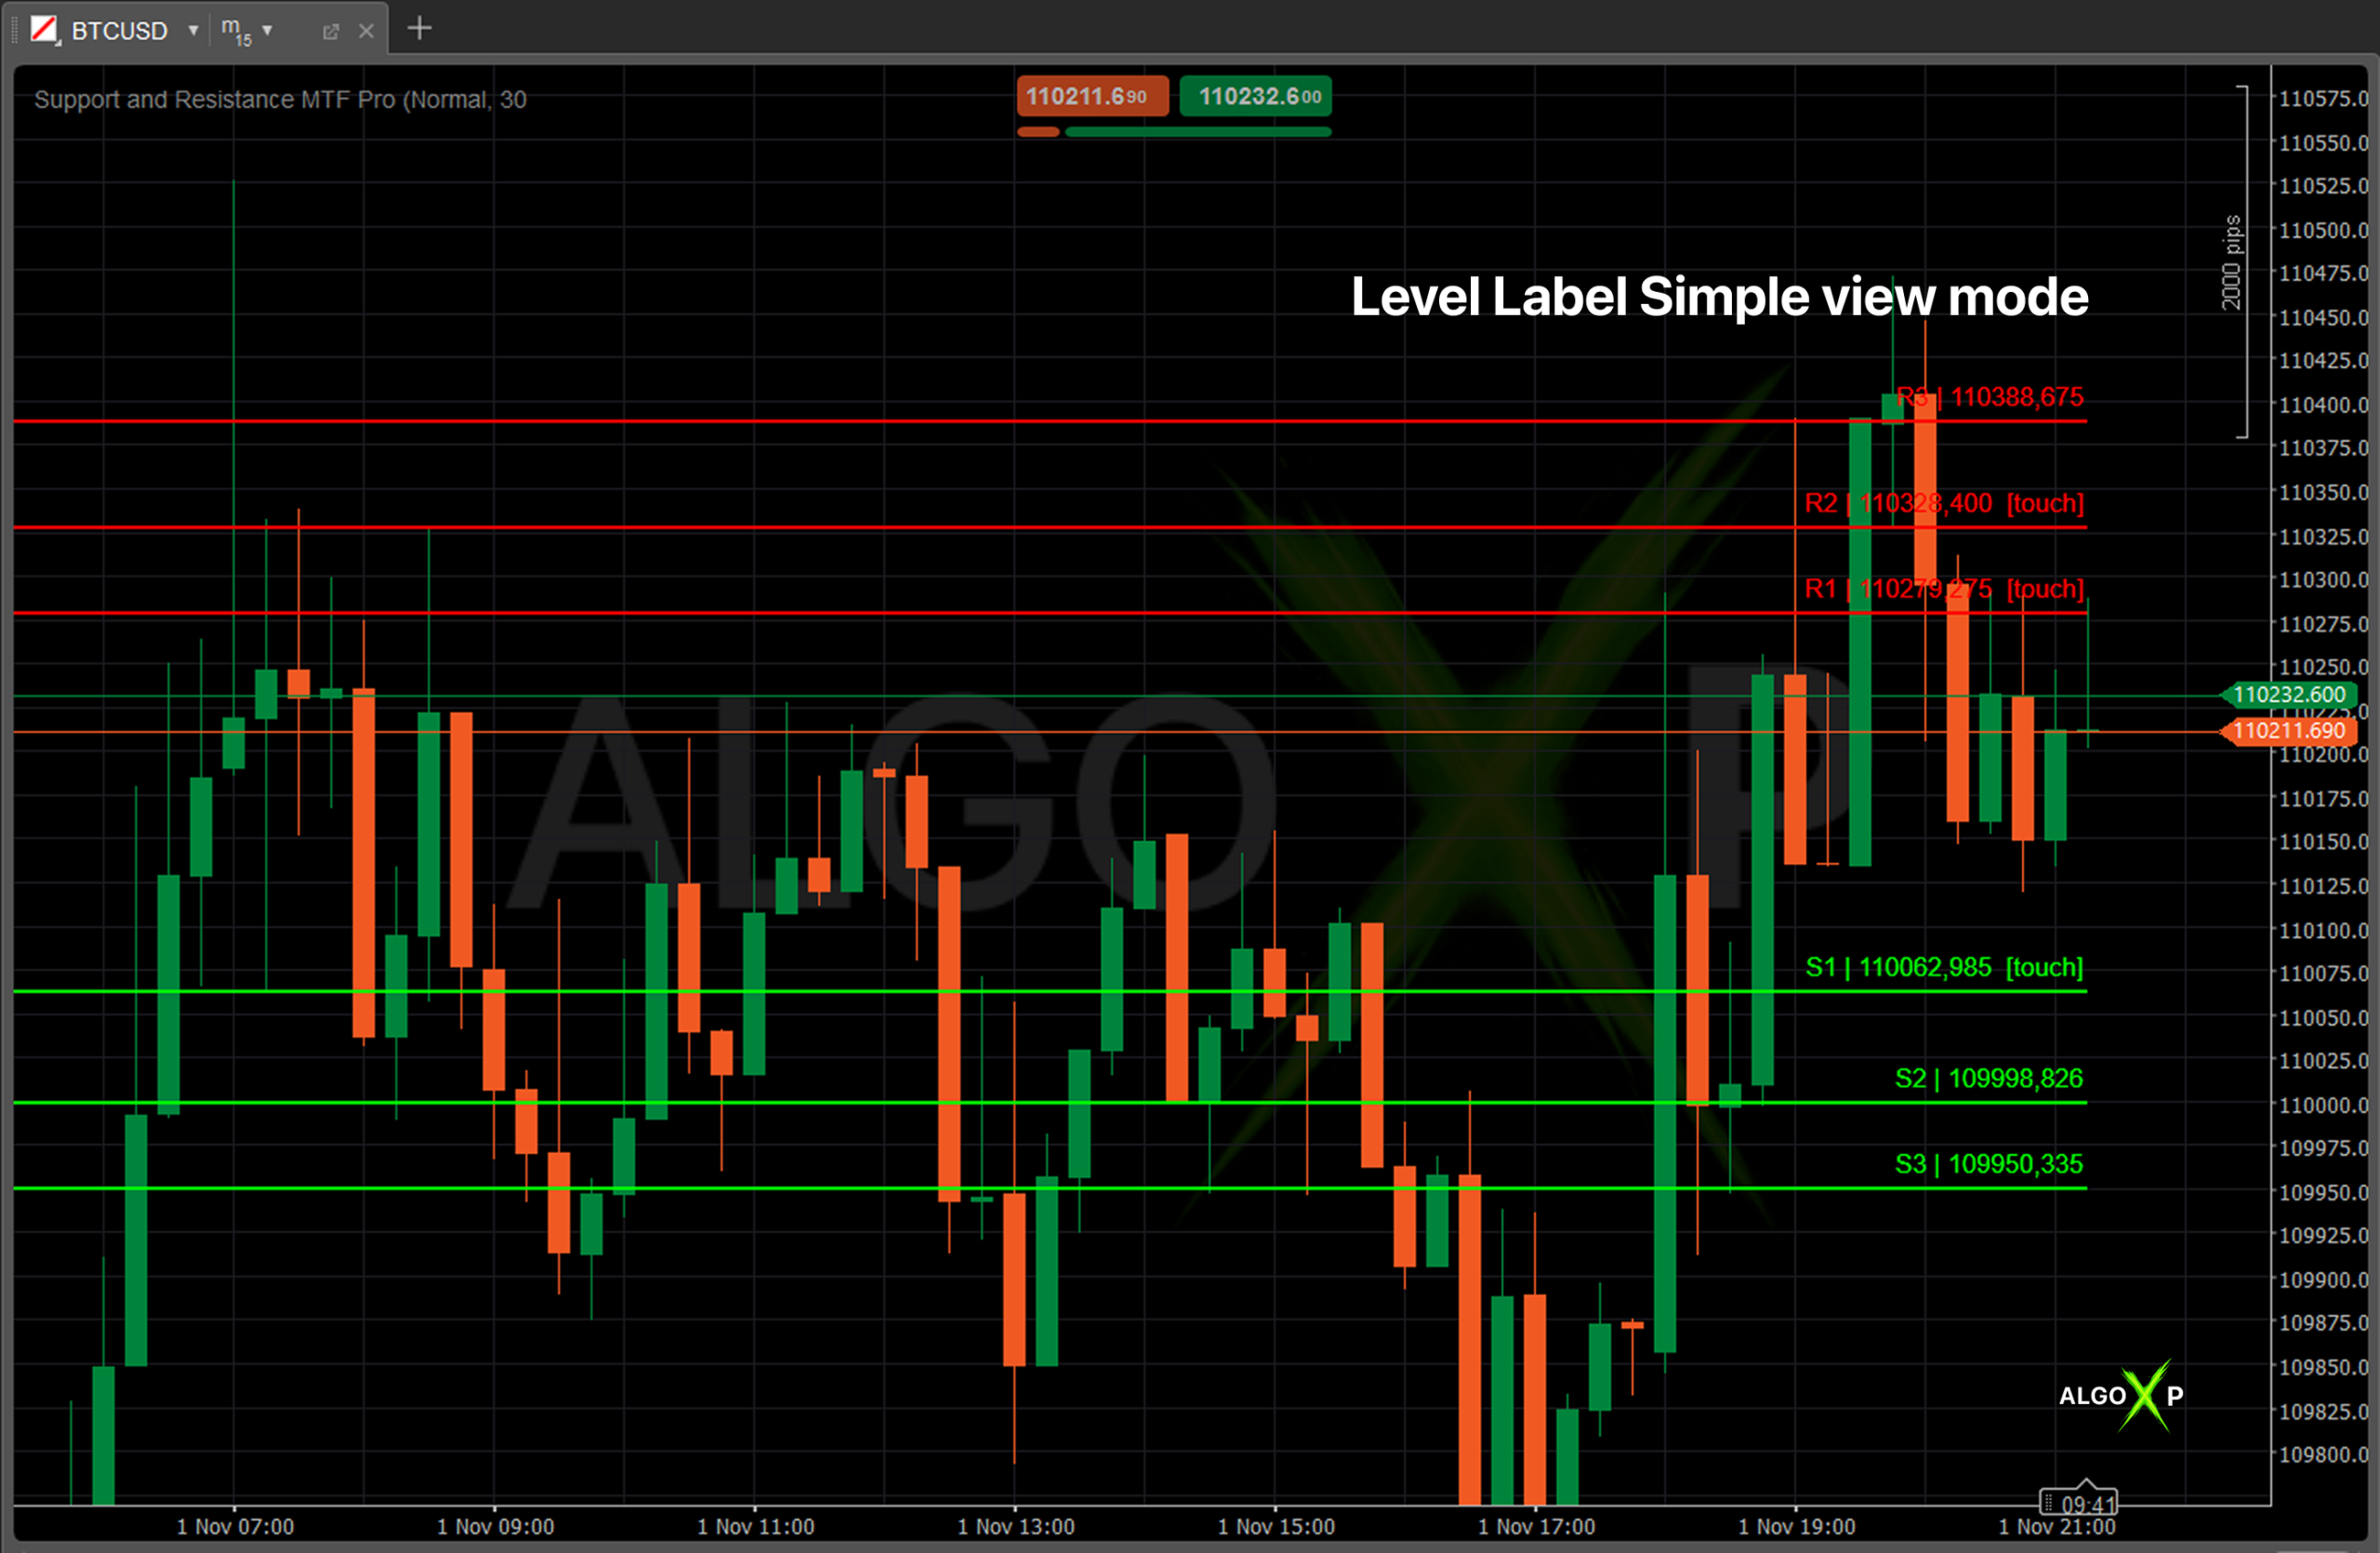
- • Simple →
S1 | 1.08340 - • Pro →
S1 | 1.08340 | 18.7p | 0.68ATR | ● x5 - Correct distance math: choose Bid or Ask as reference for pips/ATR — ideal for FX, metals, indices, crypto.
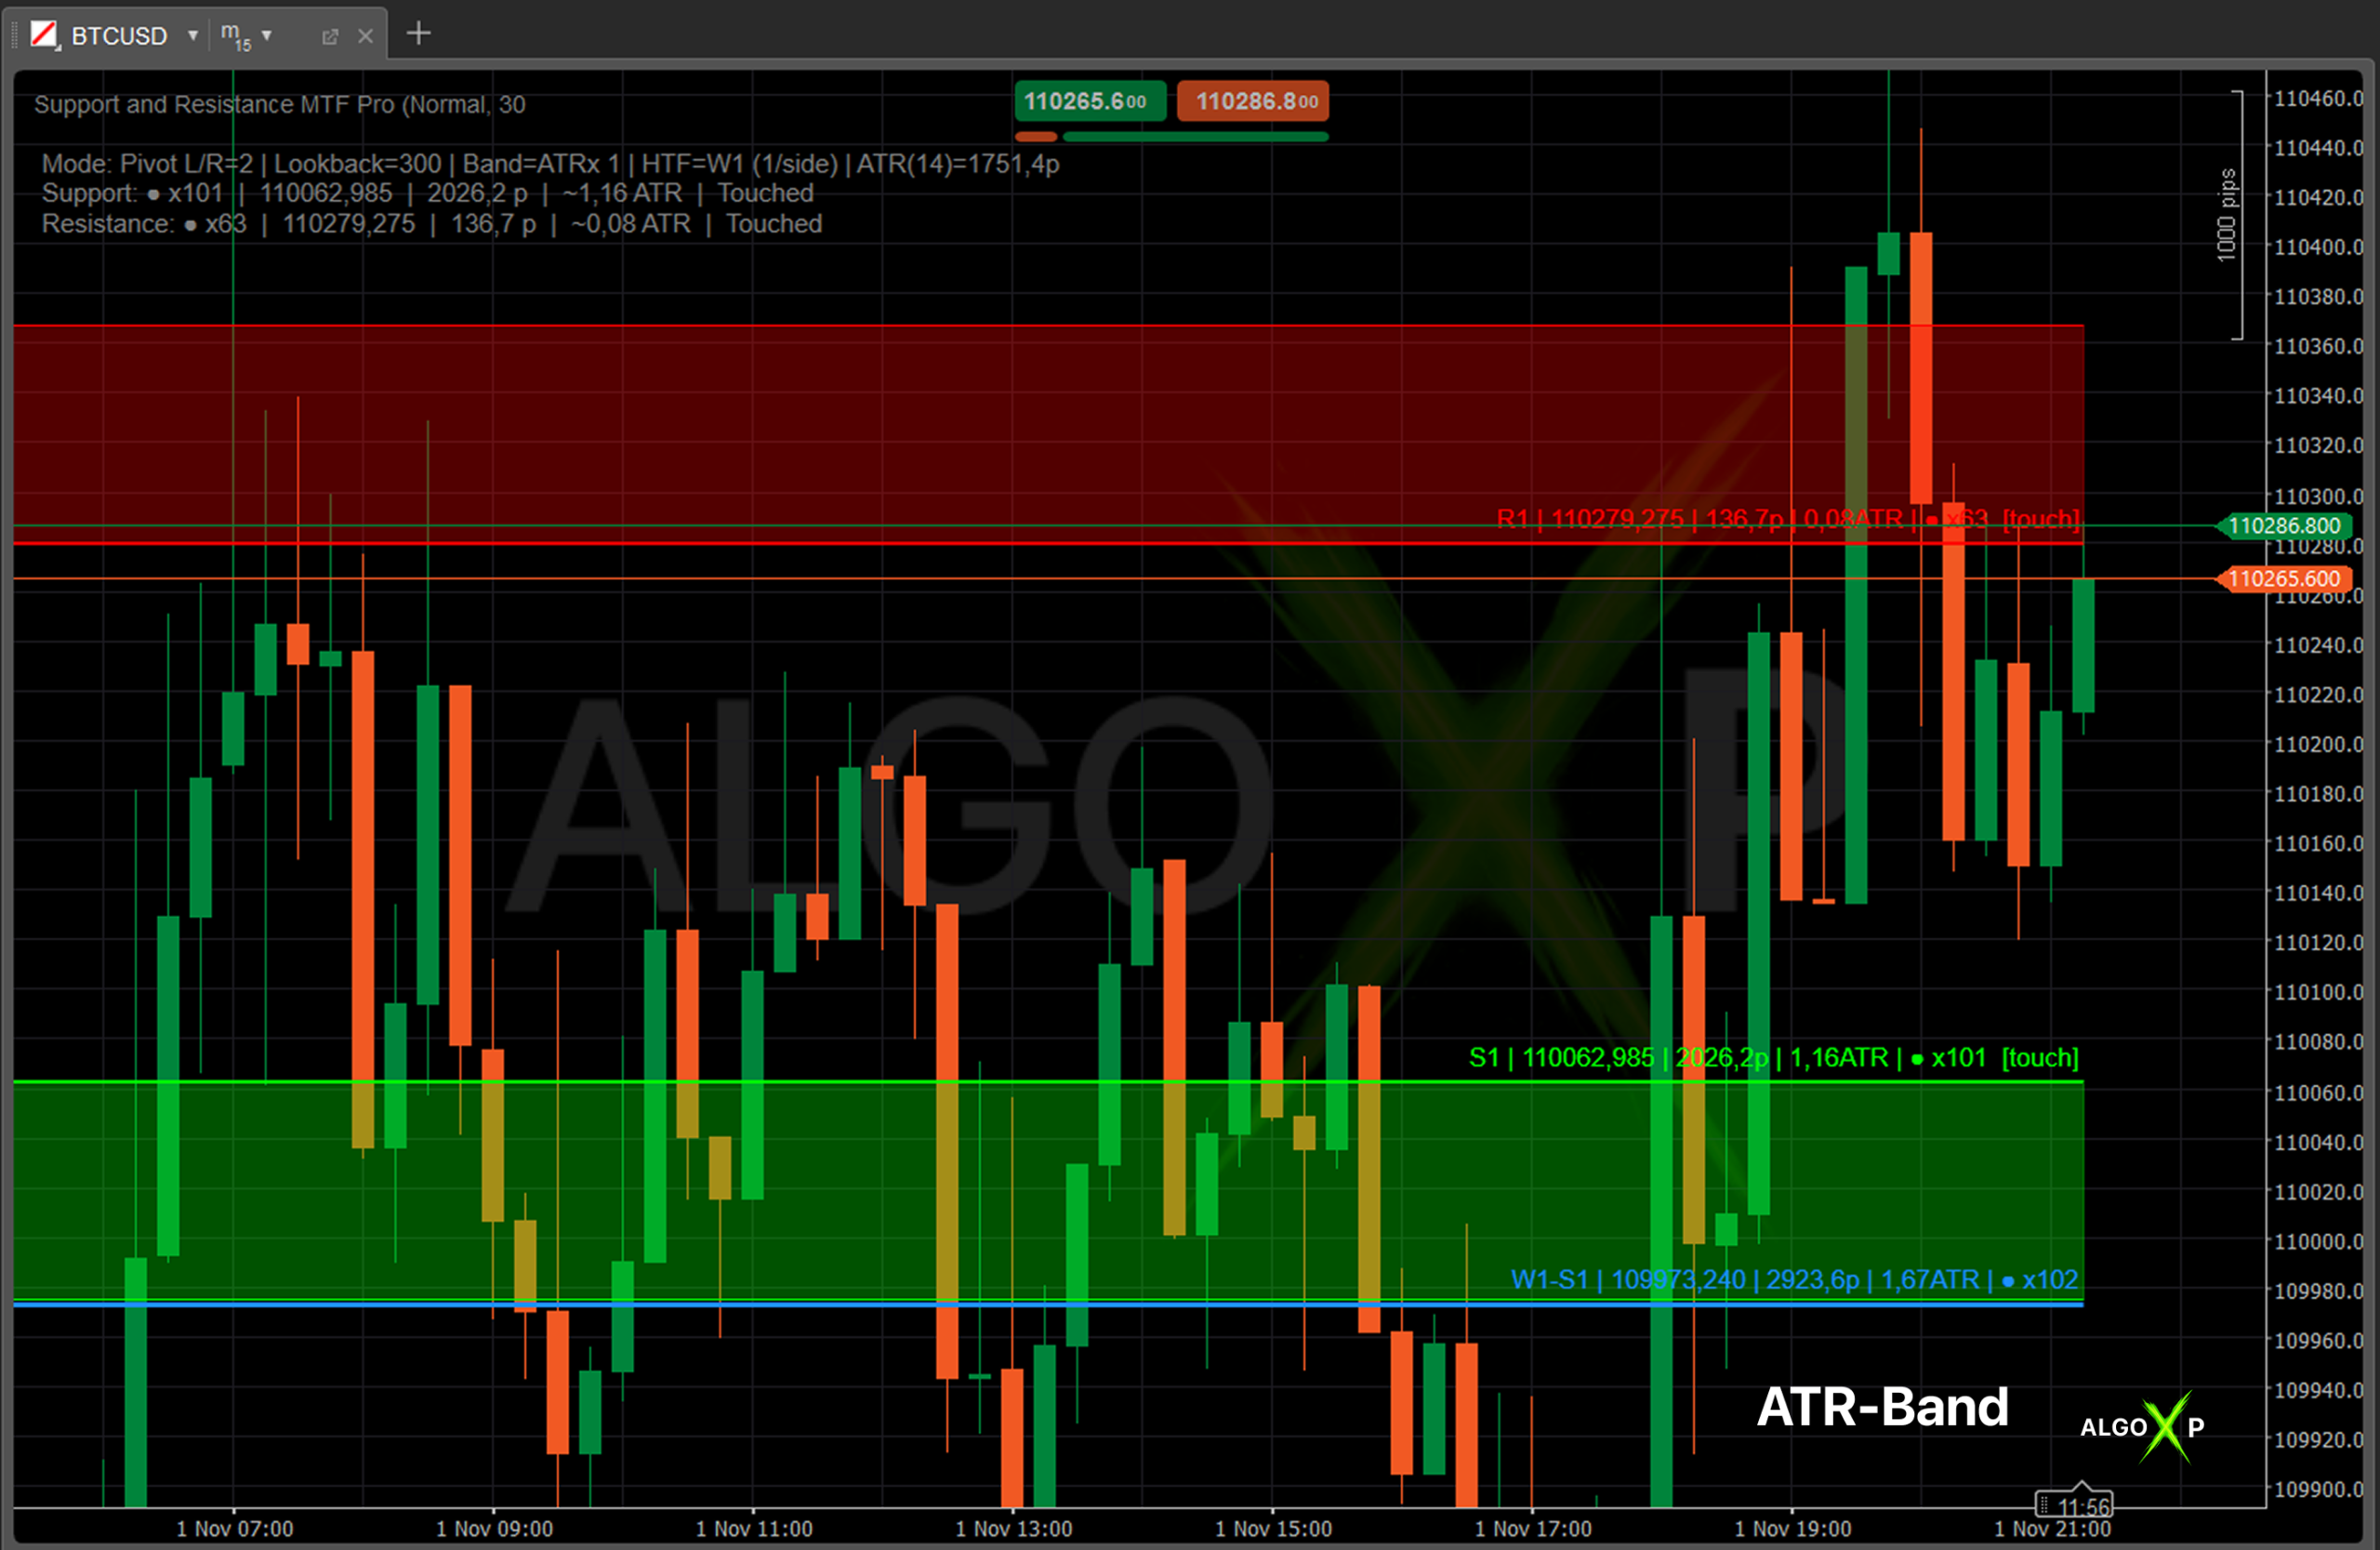
- Nearest Bands only: optional semi-transparent half-bands (ATR×Factor or Fixed pips) on the closest S & R.
- Strength metrics: raw touch count (● xN) with optional decay (Half-Life) and level expiry by age.
- Performance-tuned: HTF structure recalculates only when the HTF bar closes — no flicker, no drag.
- Compact HUD: shows mode, ATR(14), and live distance to the nearest support/resistance.
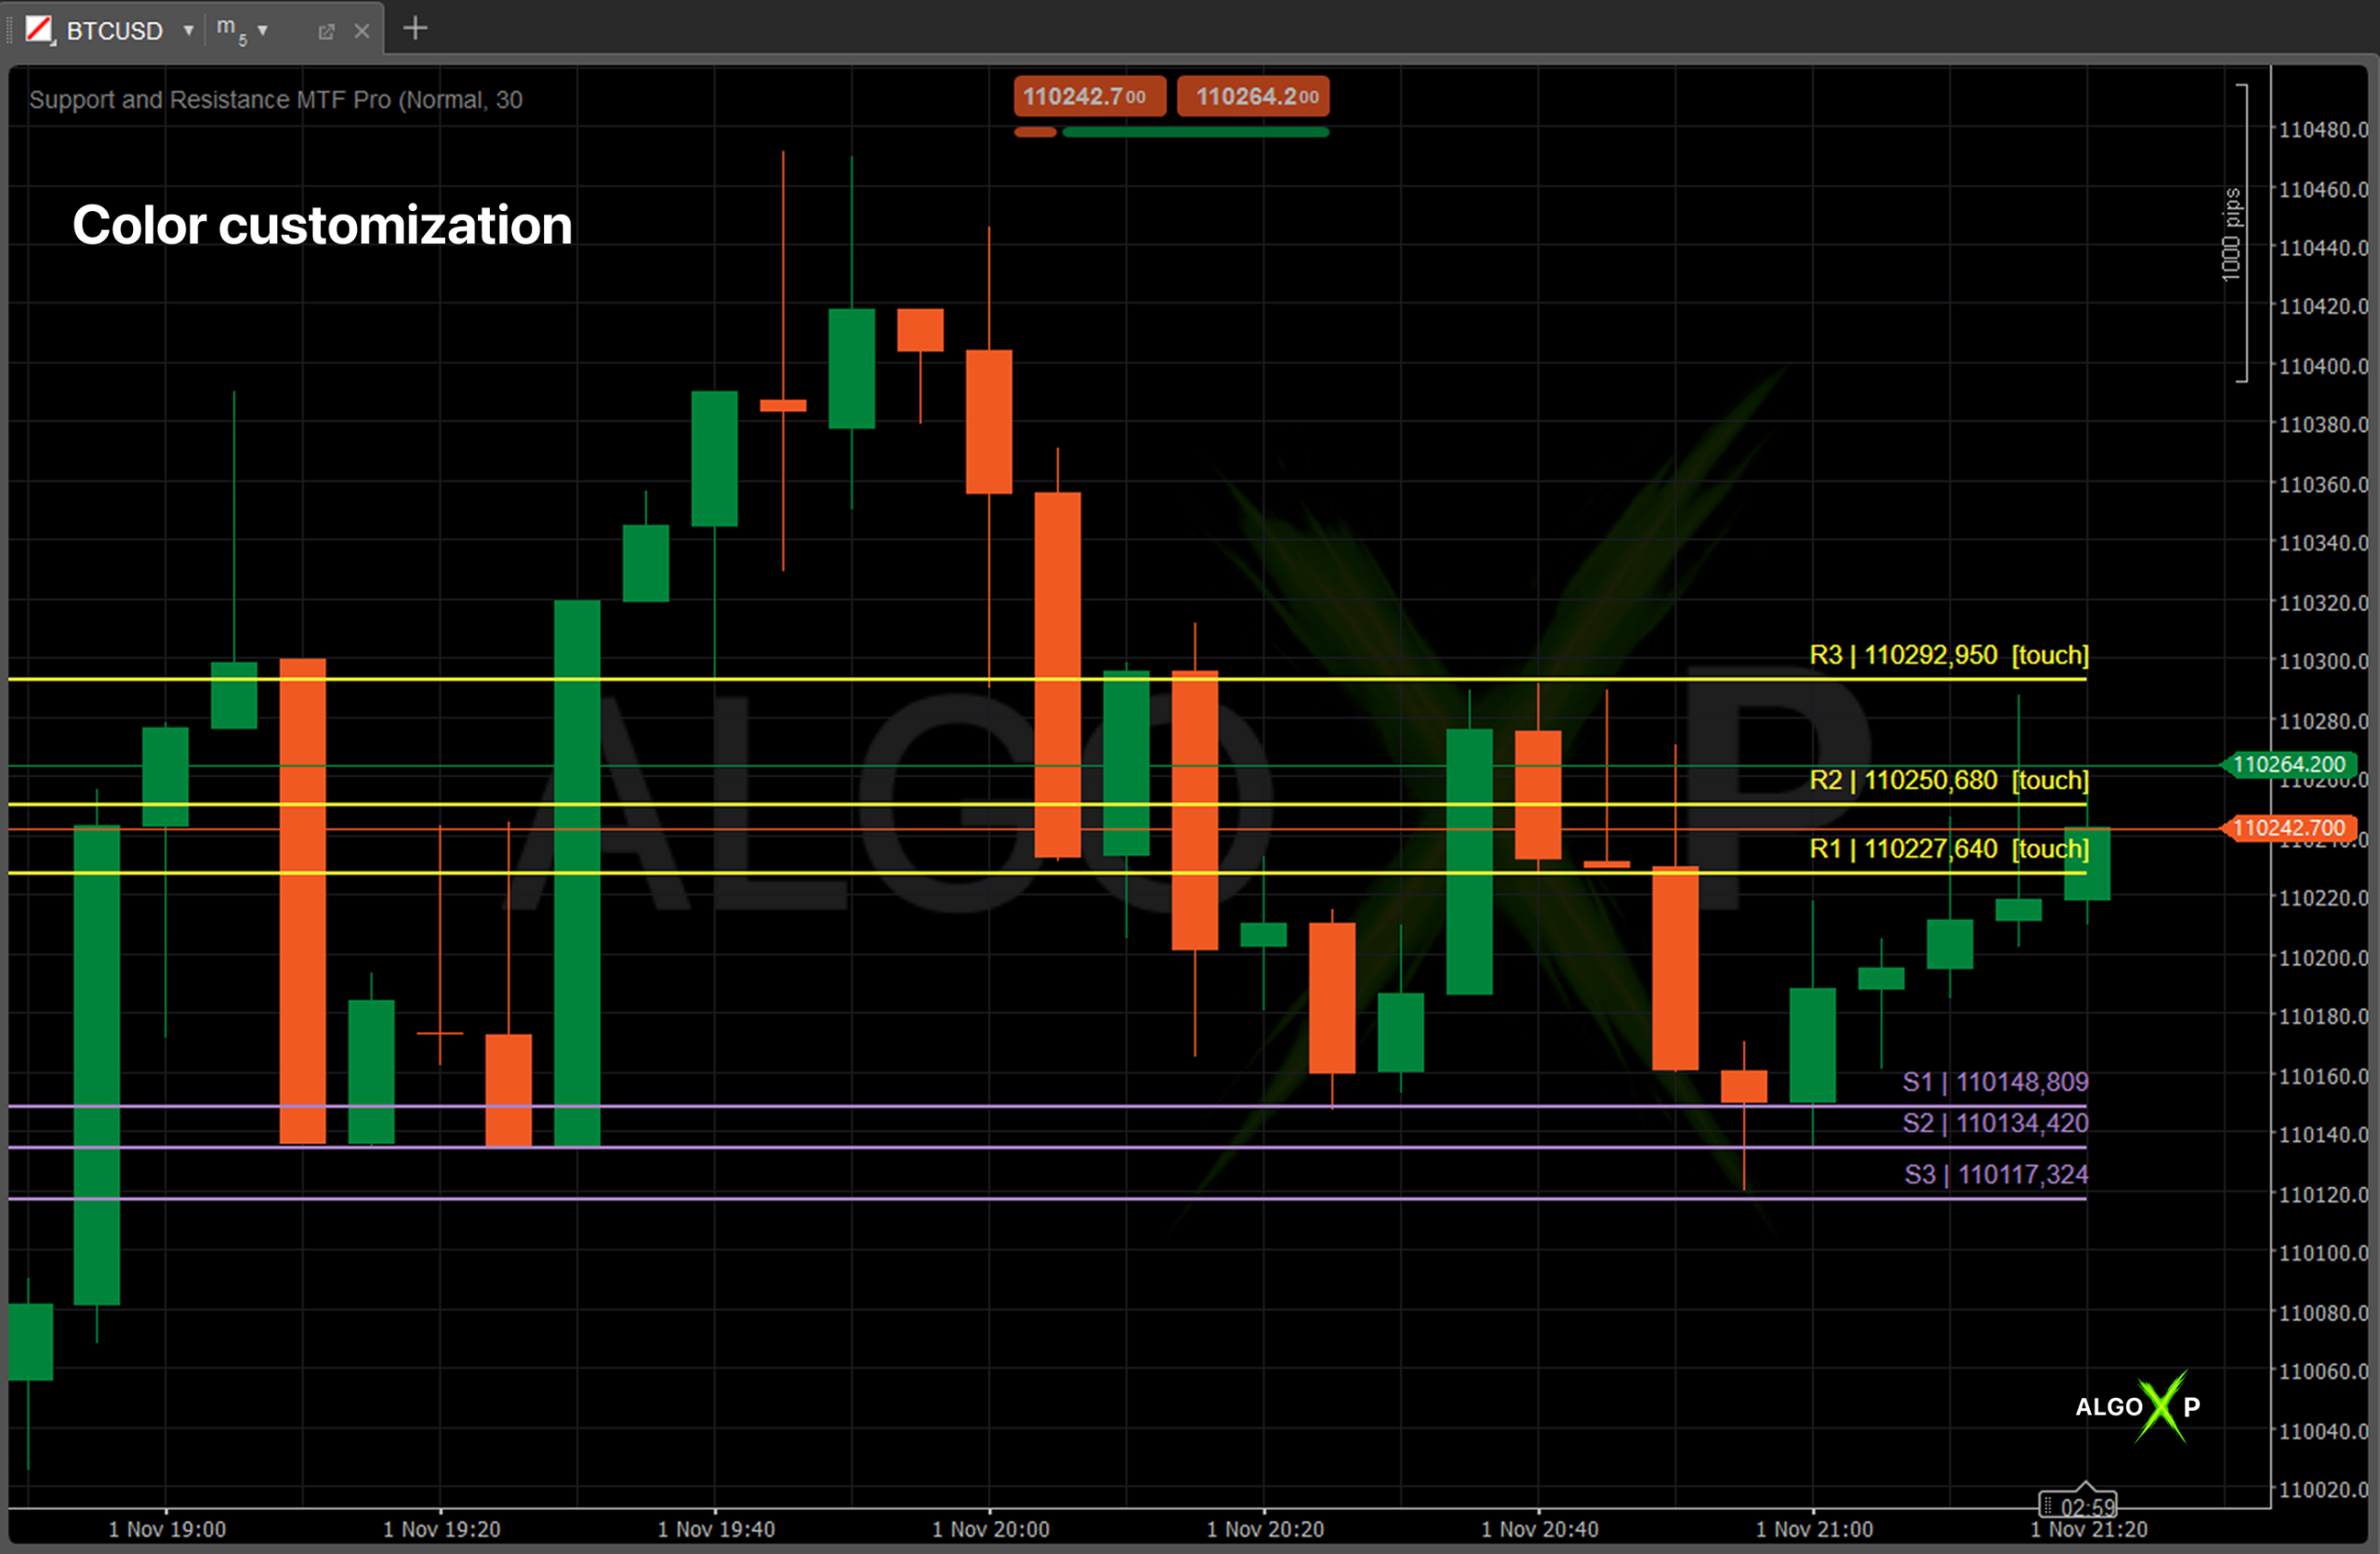
- Full visual control: custom colors for S/R and HTF lines; smooth, non-flicker drawing..
🎯 Perfect for:
- Price-action traders who rely on clean, trustworthy S/R structure (not formulaic lines).
- Intraday & swing traders who need consistent reading across symbols and timeframes.
- Crypto, metals, and indices traders who care about correct pips vs. tick/$ math and Bid/Ask choice.
- Systematic traders who filter by strength (touches), age (decay), and freshness (expiry).
- Anyone who wants fast, uncluttered charts with clear timing cues via nearest bands.
⚡ Why Pro?
- Sees the right levels faster and with less noise.
- MTF priority makes important levels obvious and consistent.
- Auto-numbering + HTF tags remove hesitation in live decisions.
- Two label modes fit both minimalists and data-driven traders.
- Bid/Ask distance and ATR context improve execution discipline.
- Performance-safe even on busy charts and lower timeframes.
Core controls set how zones are found and filtered: Pivot preset, Lookback Bars, Max Zones per Side, and Min Touches determine density and strength of S/R.
Context & visuals come from Use MTF + timeframe & per-side cap, Bands (ATR or Fixed width), Show Right Labels with Simple/Pro detail, Distance Price (Bid/Ask), Draw Back Bars, and color settings.
Stability & freshness are tuned via Decay (Half-Life) and Expiry, while HTF recalculation is performance-optimized to run only on the higher-TF bar close.
Support and Resistance MTF Pro – Parameters Overview
Core
- Pivot Length (preset)(Clean | Normal | Detailed, default: Normal)
Chooses swing sensitivity and merge tolerance under the hood.- Clean: Stricter pivots (L/R=3), wider merge tolerance → fewer, stronger zones.
- Normal: Balanced pivots (L/R=2), medium merge tolerance → recommended default.
- Detailed: More sensitive pivots (L/R=2) + tighter merge tolerance → more zones, finer structure.
Use when: - Clean for higher TFs or when you want fewer signals.
- Detailed for scalping or when you need denser S/R mapping.
- Lookback Bars
History depth scanned for pivots and touch-counts. More bars = more potential zones and heavier CPU.
Tip: 600–1200 is typically enough; increase for swing trading or sparse markets. - Max Zones per Side
Cap of support (below price) and resistance (above price) levels retained after ranking by strength.
Tip: Keep 2–4 for a clean chart; raise on higher TFs. - Min Touches to Validate
Minimum raw touches within a zone (top↔bottom) required to keep it.
Increase to show only robust, repeatedly respected zones.
Decrease to reveal early/younger levels.
Bands (Nearest S&R highlight)
- Show Band (Nearest S&R)(default: false)
Draws a semi-transparent “half-band” only on the nearest support and nearest resistance for timing clarity.- Support band: from Mid − Half to Mid
- Resistance band: from Mid to Mid + Half
- Band Width Mode(ATR | FixedPips, default: ATR)
Chooses how Half (half-width) of each zone is derived.- ATR: Half = ATR(14) × ATR Factor ÷ 2 → adaptive to volatility.
- FixedPips: Half = FixedPips × PipSize ÷ 2 → stable visual width across time.
- ATR Factor (Band Width)
Multiplier for ATR width when Band Width Mode = ATR.
Tip: 0.8–1.4 is a good working range depending on symbol volatility. - Fixed Band (pips)
Half-band in pips when Band Width Mode = FixedPips.
Tip: Pick values that reflect instrument scale (e.g., larger for indices/crypto).
View
- Draw Back Bars (lines depth)
How far to draw S/R lines into the past (visual depth). Does not affect detection logic.
Tip: Smaller for performance; larger if you want historical context visible. - Support Color
- Resistance Color
- HUD Color
Visual styling for lines/text. - Show HUD (default: true)
Toggles compact panel with mode info and live distances to nearest S/R (in pips and ~ATR).
Tip: Keep on during tuning; can be hidden after you’re comfortable.
Right Labels (on-chart level tags)
- Show Right Labels (default: true)
Places labels just to the right of the latest bar on each level line. - Right Label Mode(Simple | Pro, default: Pro)
Label content:- Simple:
S1 | 1.08340(orR1 | …) - Pro:
S1 | 1.08340 | 18.7p | 0.68ATR | ● x518.7p= distance from the selected Distance Price (see below) to the level0.68ATR≈ that distance relative to ATR(14)● x5= raw touch count used in ranking
- Simple:
- Distance Price(Bid | Ask, default: Bid)
Selects the reference price for pip distance/ATR multiple in the HUD and Pro labels.- Bid: typical for sell-side reference or neutral reading on FX.
- Ask: useful if you want distance from potential buy execution.
Note: ATR is always ATR(14) from the instrument; pips respectSymbol.PipSize.
MTF (Higher-Timeframe Zones)
- Use MTF Zones (default: false)
Enables detection of zones on a higher timeframe (HTF). HTF zones get priority: if an HTF zone overlaps an LTF zone (within ATR-based tolerance), the LTF zone is upgraded (HTF price/width/weight). - MTF TimeFrame (M1, M5, M15, M30, H1, H4, D1, W1 | default: H1)
- MTF Max Zones/Side (default: 2)
Same concept as LTF per-side cap, but for HTF zones before merging with LTF. - MTF Line Color
Color for HTF (upgraded or pure HTF) lines/labels.
MTF performance behavior:
- HTF swings/zones are recalculated only when the HTF bar closes. This avoids heavy, unnecessary updates every LTF tick while keeping HTF structure accurate.
Advanced (Aging & Expiry)
- Use Decay (aging) (default: false)
When ON, older touches count less: weight decays as0.5^(age / HalfLife).
Effect: recent reactions matter more when ranking zones. - Half-Life (bars) (default: 600)
Controls how fast touch weight halves. Lower = faster aging (recent behavior dominates). - Expire After (bars, 0=off) (default: 0)
Ignores touches older than this age during counting.
Tip: Use on fast markets to keep zones “fresh”.
Tips & interactions
- Nothing on chart?
Lower Min Touches, increase Lookback Bars, or switch to Detailed preset. Make sure the symbol’sPipSizeis correct in your platform (especially for crypto/indices). - Performance:
- Keep Lookback Bars reasonable (600–1200).
- Limit zones per side (2–4).
- MTF recalculates only on HTF close → safe to keep Use MTF ON.
- Bands draw only on nearest S & R to avoid clutter.
- Distance numbers differ from your broker’s idea of a “pip”?
The indicator uses the platform’sSymbol.PipSizefor conversion. For instruments like BTCUSD or indices, a “pip” may represent a different absolute value than classic FX — that’s correct by design. If you need different semantics, use Label Mode = Simple or interpret the “pips” as platform-pips. - When to use Ask as Distance Price:
When evaluating buy risk/immediacy in instruments with wider spreads (metals, crypto). For sell-side focus, Bid is typically fine.
How to use
- Attach to chart
Drop the indicator on your symbol/timeframe. Keep default settings for a clean start. - Pick the structure density
- Pivot Length (preset): Normal (balanced).
- Lookback Bars: 600–1000 (history to scan).
- Max Zones per Side: 2–3 (keeps chart clean).
- Min Touches to Validate: 2 (filters out weak/one-off levels).
- Turn on higher-timeframe context (optional but recommended)
- Use MTF Zones: ON → MTF TimeFrame: H1 (or H4/D1 for swings).
- MTF Max Zones/Side: 1–2.
(HTF zones auto-upgrade overlapping LTF zones; recalculation happens only when the HTF bar closes.)
- Choose label style & distance basis
- Show Right Labels: ON.
- Right Label Mode:
- Simple →
S1 | 1.08340 - Pro →
S1 | 1.08340 | 18.7p | 0.68ATR | ● x5
- Simple →
- Distance Price: Bid (default) or Ask (use Ask if you measure buy-side immediacy).
- Make zones visually readable
- Bands (optional): Show Band = ON to highlight only the nearest Support & Resistance.
- Band Width Mode: ATR (adaptive) with ATR Factor 1.0–1.3, or FixedPips if you want constant width.
- Tweak Support/Resistance/HUD colors and Draw Back Bars to taste.
- Read the HUD (if enabled)
Top-left you’ll see: mode, ATR, and live distance (pips & ~ATR) to the closest S and R.
Use it to gauge room to level, sizing, and whether a touch/retest is near. - Trade usage (typical manual workflow)
- Confluence: Prefer HTF-upgraded levels and those with higher
● xNtouches. - Entry ideas:
- Reactions on first touch of S/R (fade), or
- Break & Retest back into the zone (continuation).
- Stops: Just beyond the band/half-zone; size with the HUD’s pip/ATR readouts.
- Targets: Next opposite zone, partials at mid/nearest zone, or ATR-multiple.
- Confluence: Prefer HTF-upgraded levels and those with higher
- If you see nothing (or too few lines)
- Lower Min Touches, raise Lookback Bars, switch Pivot to Detailed, or increase Max Zones per Side.
- If it feels heavy
- Reduce Lookback Bars, Max Zones per Side, and keep Use MTF ON (it’s optimized to recalc only on HTF close).
- Keep Bands ON (they draw only on the nearest S/R) or turn them OFF if you want ultra-minimalism.
- If pips look “odd”
- The indicator uses your platform’s Symbol.PipSize. On crypto/indices a “pip” ≠ $1; it’s correct by broker spec.
- Use Simple labels if you prefer to see just level names + prices.
One-minute presets to try
- FX intraday (M5–M15): Normal | Lookback 800 | Zones/side 3 | MinTouches 2 | MTF=H1 (1–2/side) | Labels Pro | Bands ON | ATR 1.1
- Metals/Crypto fast: Detailed | Lookback 1000 | Zones/side 3 | MinTouches 2–3 | MTF=H1/H4 | Labels Pro | Bands ON | ATR 1.2–1.4
- Swing (H1/H4): Normal (or Clean) | Lookback 1200 | Zones/side 2–4 | MinTouches 1–2 | MTF=D1 (1–2/side) | Labels Simple/Pro
FAQ – Support and Resistance MTF Pro
It detects swing-based support & resistance zones from pivots, merges nearby extremes, ranks them by strength (touch count with optional decay), and draws only the top N levels per side. Pro adds MTF zones with priority, label modes, Bid/Ask distance, decay/expiry, and performance-tuned HTF recalculation.
Two common reasons:
Your Min Touches filter removes weak levels. Lower it slightly (e.g., 2 -> 1-2).
The per-side cap (Max Zones per Side / MTF Max per Side) is limiting how many are kept.
Ensure:
You have at least Lookback Bars worth of data and enough bars to form pivots.
Min Touches isn’t set too high for the current symbol/TF.
If MTF is on, the HTF series is available for your symbol.
Try zooming out – lines are drawn back Draw Back Bars bars from the right edge.
When a higher-timeframe (HTF) zone overlaps a lower-timeframe zone, the HTF upgrades the level (price, width, and weight), preventing duplicates and emphasizing the dominant structure.
They’re dynamic: S1/R1 are the nearest valid support/resistance relative to current price. As price moves, numbering can update to reflect the nearest zones.
Simple: S1 | 1.08340 (clean, price-only).
Pro: S1 | 1.08340 | 18.7p | 0.68ATR | x5 showing price, live distance in pips, ATR multiple, and touch count.
Yes. Set Distance Price = Bid or Ask. Labels/HUD distances use your choice (use Ask if you plan buy entries and want conservative distances on wide-spread symbols).
Bands are half-zones around the closest support and resistance for clarity of execution. They can be ATR-scaled (factor) or Fixed pips. Limiting to the nearest pair reduces chart clutter.
It filters out zones with too few historical interactions. Higher values keep only stronger, retested levels; lower values reveal more context (but can add noise).
Decay (Half-Life): older touches count less than recent ones, keeps zones “fresh.”
Expiry: drops zones with touches older than X bars, useful in fast markets where old structure loses relevance.
For performance and stability, HTF recalculation runs only when the HTF bar closes, not on every tick of the lower TF. This mirrors how HTF structure actually forms and avoids flicker/lag.
ATR mode: width = ATR(14) x ATR Factor (half-width).
Fixed mode: width = Fixed Band (pips) (half-width).
HTF zones use a slightly wider default to reflect their higher significance.
Yes: adjust Max Zones per Side (LTF) and MTF Max Zones/Side (HTF). Remember that Min Touches and Lookback also affect how many survive ranking.
Pip size depends on the symbol’s settings (broker-specific). The indicator uses Symbol.PipSize and Symbol.Digits, so pips/labels reflect your broker’s contract. For crypto or indices, pip != 0.0001, this is expected.
Scalping/Intraday: 600-1000 bars to capture recent structure.
Swing/HTF: 800-1500 bars for context without bloat.
Bigger lookbacks find more candidates but can be heavier.
Tighten merge tolerance indirectly by using Clean preset (longer pivots) or reduce ATR Factor / Fixed Band.
For more detail, try Detailed preset (shorter pivots) or slightly increase ATR factor.
It shows current mode (pivot L/R, lookback, band mode, HTF), plus for the nearest S/R: touch strength, live distance in pips, and ~ATR multiple, along with the state (Touched/Break/Retest/Flip).
Touched: price interacted with the zone this bar.
Broken: price cleanly moved through the zone.
Retest: after break, price retested the zone.
Flip: a broken support acts as resistance (or vice versa).
Check that Use MTF Zones is ON, the MTF timeframe is valid for your symbol, there’s enough HTF history, and MTF Max Zones/Side isn’t set to 0 (use 1-2 for clarity).
Use HTF only if needed, and keep MTF Max/Side reasonable (1-2).
Avoid excessive Lookback and overly large Max Zones per Side.
Keep Bands on only if you need the visual cushion.
Decay/Expiry add light math, still fine, but don’t max everything at once.

